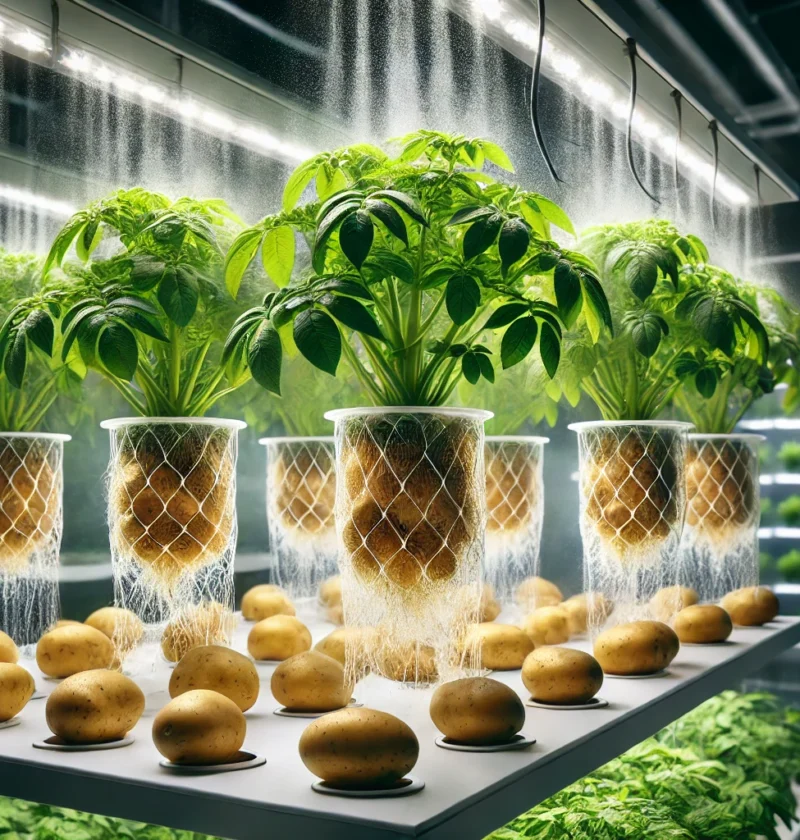
Growing potatoes without soil may sound unconventional, but it’s becoming an innovative and sustainable farming method. Using aeroponics, potatoes grow in the air with their roots misted with nutrient-rich solutions. This method offers faster growth, higher yields, and reduced risk of disease.
—
1. Understanding Aeroponics
Aeroponics is a soil-free growing method where plants are suspended in the air, and their roots are regularly misted with a nutrient solution. This system allows plants, including potatoes, to absorb essential nutrients efficiently, leading to quicker growth and higher yields.
—
2. Necessary Materials
Before starting, gather the following materials:
Aeroponic system: A structure designed to suspend plants and mist roots with nutrient solutions.
Potato tubers or cuttings: Certified disease-free seed potatoes work best.
Nutrient solution: A liquid mix containing essential nutrients for plant growth.
pH testing kit and solutions: To ensure the nutrient solution maintains the ideal pH level.
Net pots: Small pots to hold the potato tubers or cuttings.
—
3. Steps for Aeroponic Potato Cultivation
Step 1: Setup the Aeroponic System
Assemble the aeroponic system according to the manufacturer’s instructions.
Ensure it includes misters for nutrient delivery and a reservoir for the nutrient solution.
Step 2: Planting the Potatoes
Place the potato tubers or cuttings in net pots, ensuring they are securely positioned.
Suspend the net pots in the aeroponic system, with the base exposed for root growth.
Step 3: Prepare the Nutrient Solution
Mix the nutrient solution according to the manufacturer’s instructions.
Use the pH testing kit to adjust the solution to an optimal pH of 5.8-6.5.
Step 4: Misting the Roots
Program the aeroponic system to mist the potato roots regularly (usually every 5-10 minutes).
Ensure the mist reaches all the roots without oversaturating them.
Step 5: Monitor Growth
Regularly check nutrient levels in the reservoir and replenish them as needed.
Test and adjust the pH weekly to maintain the ideal range.
Observe the plants for signs of growth and health issues.
Step 6: Harvesting the Potatoes
Potatoes are ready for harvest when the plants flower and begin to die back, usually after 10-12 weeks.
Gently remove the net pots and collect the potatoes from the roots.
—
4. Benefits of Aeroponic Potato Cultivation
Aeroponic systems offer several advantages over traditional soil farming:
Reduced Disease Risk: Eliminates soil-borne diseases and pests.
Higher Yields: Potatoes grown aeroponically often produce larger harvests.
Space Efficiency: Vertical setups save space, making this method ideal for urban farming.
Water Efficiency: Uses significantly less water compared to soil farming.
Sustainable Farming: Supports eco-friendly practices by reducing resource consumption.
—
5. Challenges and Considerations
Initial Cost: Setting up an aeroponic system can be expensive, though it pays off in the long run.
Monitoring: Requires consistent monitoring of nutrient levels, pH, and misting schedules.
Learning Curve: Beginners may need time to adapt to the system’s requirements.
—
Conclusion
Aeroponic potato cultivation is an innovative and sustainable farming method that eliminates the need for soil while enhancing yields and efficiency. With the right tools and techniques, anyone can successfully grow potatoes aeroponically, paving the way for modern agricultural practices. Whether for personal consumption or commercial farming, this method offers a glimpse into the future of farming. 🌱