Harnessing Rainwater: Building a Self-Irrigating Raised Bed Garden
Introduction
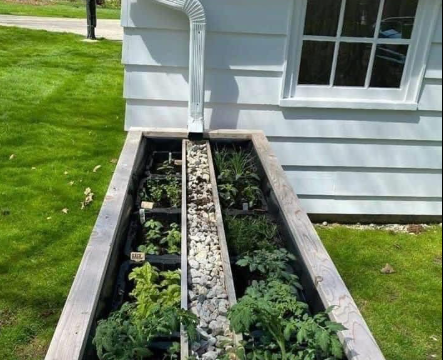
I used to watch rainwater pour from our gutter and pool around the yard, doing nothing but making mud puddles. One afternoon, as I stood by the window, I thought, “What if that water could actually work for us?” That moment sparked a small home-grown revolution. I built a raised garden bed with a gravel trough down its center, aligned perfectly beneath the downspout. Now, when it rains, the water flows naturally into the garden—no hose, no buckets, just pure gravity doing its thing. Tomatoes, basil, peppers, and more all thrive thanks to a bit of planning and a lot of love. This is the story and guide to harnessing every drop, turning rooftop runoff into a lush, self-watering oasis.
1. Historical Context of Rainwater Harvesting
Rainwater harvesting is as old as civilization itself. In Ancient Mesopotamia, 4,000 BCE, clay cisterns collected seasonal downpours. The Nabataeans carved hundreds of rock-cut cisterns in Petra (c. 300 BCE), channeling flash floods into underground reservoirs. Medieval Islamic engineers built qanāt systems—underground tunnels that transported groundwater—but also roofwater catchments feeding public pools. In Europe, 18th-century English estates installed lead-lined gutter troughs feeding ornamental lakes. By the 19th century, Victorian London households used “water butts” to save rainwater for laundry and gardens, mindful of increasingly polluted mains water. Each era refined techniques—cisterns gave way to barrels, barrels to tanks, and now seamless gutter-to-garden systems. Understanding these roots reveals that today’s DIY gravity-fed bed is merely the latest evolution in millennia of human ingenuity.
2. Chemistry & Benefits of Rainwater
Rainwater is naturally soft (low in calcium and magnesium), slightly acidic (pH ~5.6 due to dissolved CO₂), and free of many municipal treatment chemicals. Its low hardness helps dissolve and mobilize soil nutrients, while mild acidity improves availability of phosphorus and micronutrients. Unlike tap water, rainwater contains no chlorine, chloramine, or fluorides, all of which can disrupt beneficial soil microbes. However, rooftop runoff may pick up particulate debris (leaves, bird droppings) and soluble pollutants (airborne dust, trace metals in roofing materials). A simple first-flush diverter (the initial 10 – 15 L of runoff) can capture most contaminants, routing them to drain, while the cleaner subsequent flow feeds the garden. Gravel troughs also act as a bio-filter: as water percolates down, aerobic microbes colonize the stones, breaking down organic matter before the water soaks into the soil below. This natural filtration not only protects plant roots but also fosters a living filter bed teeming with beneficial bacteria and fungi.
3. Step-by-Step Build Tutorial
3.1 Materials & Tools
- Raised‐bed frame: untreated cedar or composite lumber, 4 ft × 8 ft × 1 ft high
- Landscape fabric (weed barrier)
- ¾″ crushed gravel or pea gravel
- PVC or corrugated plastic trough (4 in × 4 in channel)
- Downspout diverter kit
- Soil mix: 50% topsoil, 30% compost, 20% coconut coir or peat moss
- Level, tape measure, circular saw, drill, screws, utility knife
3.2 Construction Steps
- Site preparation: Level the ground where the bed will sit. Ensure a slight slope (~1%) toward the center if you’re not using a channel trough to guide water.
- Frame assembly: Build the perimeter frame—four boards screwed together into a rectangle. Line the inside with landscape fabric, stapling to the top edges.
- Trough installation: Center the PVC channel beneath the downspout location. Cut the bed bottom fabric to insert the trough, then staple fabric around the channel to seal.
- Gravel fill: Pour crushed gravel into the trough cavity, smoothing level with the top edge of the trough to ensure even distribution.
- First-flush diverter: Attach the downspout diverter above the trough. Set it to send the first 10 L of rain to waste; then redirect the clean flow into the trough.
- Soil filling: Add your soil mix, packing gently around the gravel edges, filling to about 2″ below the top rim.
- Planting: Space your vegetables/herbs in rows flanking the central trough. Water deeply once to settle soil around roots.
3.3 Operation & Maintenance
- Before each rainy season, clear leaves from gutters and diverter screens.
- Inspect and flush the gravel trap annually—scoop out debris, rake the gravel lightly.
- Replenish compost atop the soil each spring to replenish nutrients.
- Monitor flow in heavy storms; add overflow holes if water backs up.
4. Extended Case Studies
Below are three real-world implementations demonstrating yields, water savings, and user experience.
| Location | Climate | Setup | Annual Rain | Yield & Savings |
|---|---|---|---|---|
| Portland, OR | Temperate maritime (37″ annual rain) |
1 bed, 4ft×8ft, single trough | ~7,100 gal caught | Tomatoes (25 lb), basil (5 lb); saved 2,000 gal tap water |
| Austin, TX | Sub-humid subtropical (34″ annual rain) |
Two beds end-to-end, diverters on both | ~6,500 gal caught | Peppers (30 lb), peppers thrived in dry months; saved 1,800 gal |
| Minneapolis, MN | Continental (32″ rain, 53″ snow) |
Bed with insulated trough; snowmelt feeds slowly | ~6,200 gal liquid equivalent | Herbs all season; reduced irrigation by 70% in summer |
5. Troubleshooting & Pro Tips
| Problem | Cause | Solution |
|---|---|---|
| Trough clogging | Leaf litter accumulation | Install finer mesh at diverter; clean monthly |
| Waterlogging bed | Insufficient drainage in soil | Add 1″ perlite layer above gravel; deepen gravel bed |
| Mosquito breeding | Stagnant water in trough | Ensure continuous flow; add mosquito dunk (Bt) monthly |
| Erosion at overflow | Heavy storms overwhelm trough | Drill 2–3 overflow holes just below soil line to divert excess |
| Algae growth | Sunlight on standing water | Shade trough with floating aquatic plants or burlap cover |
6. Integrated Garden Designs
To make the most of your self-watering bed, consider companion planting, aesthetic layouts, and seasonal rotation:
6.1 Companion Planting Map
- North edge: Tall crops (tomatoes, pole beans) to shade central trough from midday sun.
- East & west edges: Herbs (basil, parsley) that love consistent moisture but good airflow.
- South edge: Low growers (lettuce, spinach) that benefit from early-morning warmth.
6.2 Seasonal Rotation
- Spring: Lettuce, radishes, peas—fast growers that finish before heavy rains.
- Summer: Tomatoes, peppers, eggplants—rely on peak trough flows.
- Fall: Kale, spinach, brassicas—tolerate cooler, wetter conditions.
6.3 Aesthetic & Functional Layout
- Frame bed with native perennial pollinator flowers (echinacea, lavender) to support beneficial insects.
- Edge pathways with gravel to reduce mud and direct foot traffic.
- Install decorative rain chains or copper diverters to make the water entry point a focal feature.
Conclusion
What began as a simple thought—“What if rainwater could work for us?”—has blossomed into a sustainable, low-effort solution that harnesses nature’s generosity. By weaving together ancient techniques, modern chemistry, practical construction, real-world data, troubleshooting wisdom, and integrated design, you too can transform your roof’s runoff into a flourishing garden. Every drop that once made a mud puddle now feeds your plants, conserves municipal water, and reminds you that the best solutions often lie right outside your window.