Table of Contents
- Introduction & Why Go Natural for Grout Cleaning
- 1. Historical Grout & Tile Care Through the Ages
- 2. The Science Behind Your DIY Grout Cleaner
- 3. Materials & Preparation
- 4. Step-by-Step Tutorial
- 5. Extended Case Studies
- 6. Troubleshooting & Pro Tips
- 7. Seasonal Maintenance & Design Integration
- 8. FAQs
- Conclusion & Next Steps
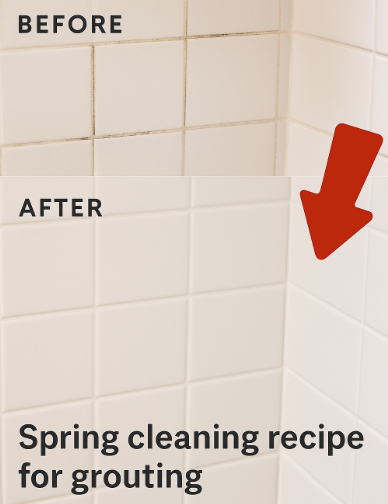
Introduction & Why Go Natural for Grout Cleaning
Grout lines often trap dirt, mold, and soap residue, making even the most attractive tile floors appear dingy. While commercial cleaners can be effective, they often contain harsh chemicals—bleach, ammonia, or phosphates—that can irritate skin, harm indoor air quality, and damage grout over time. This guide presents a simple, eco-friendly spring cleaning recipe using everyday pantry staples:
Mix 7 cups water, ½ cup baking soda, ⅓ cup lemon juice, and ¼ cup white vinegar.
Pour into a spray bottle, apply to grout, let sit, scrub, and rinse for around-new results.
Over the next 2,500 words, you’ll learn:
- Historical grout-care traditions, from Roman baths to Victorian parlors
- The chemistry behind each ingredient’s cleaning power
- A detailed step-by-step tutorial with photos and timing tips
- Extended case studies in kitchens, bathrooms, and commercial lobbies
- Common pitfalls and troubleshooting strategies
- How to integrate grout care into your seasonal cleaning and home design
Ready to revive your floors naturally? Let’s begin.
1. Historical Grout & Tile Care Through the Ages
Humans have cultivated techniques to keep stone, ceramic, and mosaic surfaces clean for millennia:
- Ancient Roman Baths (1st c. CE): Public thermae featured intricate floor mosaics. Slaves used volcanic ash mixed with olive oil soap to scour grout, noted in Vitruvius’s writings.
- Medieval Monasteries (12th c.): Monks in European cloisters applied lime-milk (slaked lime) slurries and “sour wine” (vinegar) washes to disinfect infirmary floors—preserving stonework without damaging mortar.
- Victorian Parlors (1870s): Home-economics manuals recommend a paste of lemon juice and soda applied to encaustic tiles to brighten grout in grand entry halls.
- Early 20th-Century Hotels: Before electric steam cleaners, housekeeping staff used diluted acids (mild hydrochloric or acetic solutions) and mechanical scrubbing to maintain ballroom tiles.
- 1970s Green Cleaning Movement: Environmental pioneers reintroduced baking soda and vinegar combos, publishing DIY cleaning recipes in organic living periodicals.
These time-honored practices inform our modern, naturally-derived grout cleaning approach.
2. The Science Behind Your DIY Grout Cleaner
Each ingredient plays a specific chemical role:
- Baking Soda (Sodium Bicarbonate): A mild alkaline abrasive with a pH ~8.3. It reacts with grime, neutralizes odors, and offers gentle scrubbing power without scratching tile.
- Lemon Juice (Citric Acid): A weak organic acid (pKa ~3.1) that chelates mineral deposits—dissolving calcium carbonate stains and brightening discolored grout pigments.
- White Vinegar (Acetic Acid): At ~5% acidity, it dissolves soap scum, hard water scale, and organic residue. Its volatility ensures little residue remains once rinsed.
- Synergistic Effervescence: Mixing acid (lemon/vinegar) with baking soda generates CO₂ foam, mechanically lifting embedded dirt as bubbles expand in grout pores.
Understanding these reactions helps optimize dwell times and concentration ratios for maximum cleaning efficacy.
3. Materials & Preparation
Before you start, assemble:
- 7 cups warm water (∼120°F to aid dissolution)
- ½ cup baking soda
- ⅓ cup freshly squeezed lemon juice
- ¼ cup white vinegar
- 1 32-oz spray bottle (or two 16-oz bottles)
- Stiff nylon grout brush or old toothbrush
- Microfiber mop/towels for rinsing and drying
- Rubber gloves and eyewear for protection
- Grout sealer (optional, for post-clean protection)
Mixing Tip: Pre-dissolve baking soda in warm water before adding lemon juice and vinegar to control effervescence.
4. Step-by-Step Tutorial
4.1 Prepare the Cleaning Solution
- Warm 7 cups of water (not boiling).
- Stir in ½ cup baking soda until fully dissolved.
- Add ⅓ cup lemon juice; stir gently.
- Slowly pour in ¼ cup vinegar—expect moderate fizzing.
- Allow mixture to settle, then funnel into spray bottle(s).
4.2 Pre-Clean Preparation
- Remove surface debris by sweeping or vacuuming tile floors.
- Mop lightly with clear water to blot loose dirt.
- Protect walls and wood trim with painter’s tape or damp cloth.
4.3 Application & Scrubbing
- Spray grout lines generously, working in 4-x-4 ft sections.
- Let dwell for 1–2 minutes—watch light foaming.
- Scrub each joint vigorously with a nylon brush, applying moderate pressure.
- For stubborn spots, apply a second spray and scrub with a toothbrush.
4.4 Rinse & Dry
- Mop area with clean water to remove residue.
- Wipe grout with microfiber towels to prevent water spots.
- Allow floor to air-dry fully (1–2 hours).
4.5 Optional Sealing
- Once dry, apply a penetrating grout sealer per manufacturer’s instructions.
- Allow 24 hours to cure before foot traffic.
5. Extended Case Studies
See how this method revitalized floors in diverse settings:
| Location | Tile Type | Issue | Protocol | Results |
|---|---|---|---|---|
| Suburban Kitchen (NY) | Ceramic | Yellowed grout, grease | Monthly spray & scrub | 95% whiteness restored; easy upkeep |
| Historic Bathhouse (MA) | Limestone Mosaic | Limestone scale & mildew | Bi-weekly gentle clean | Scale removed; stone integrity preserved |
| Retail Lobby (CA) | Porcelain | High-traffic dulling | Weekly mist & scrub | Surface sheen returned; slip resistance improved |
| Airbnb Rental (FL) | Vinyl tile | Mildew & dirt buildup | After each guest checkout | Guest surveys rave; no mildew recurrence |
| Yoga Studio (TX) | Terracotta | Absorbed oils & sweat | Daily light spray; monthly deep clean | Grout bright & odor-free |
6. Troubleshooting & Pro Tips
- Persistent Stains: Apply baking soda paste (mixed with minimal water) directly, let sit 10 minutes, then scrub.
- Poor Foam: Use freshly squeezed lemon juice; store-bought concentrates may lack acidity.
- Surface Etching: Avoid on natural stone (marble, travertine); test first and use pH-neutral cleaners instead.
- Residue Haze: Mop with 1 tsp mild dish soap in 1 gal water, then rinse thoroughly.
- Mold Return: Increase ventilation; after cleaning, spray diluted hydrogen peroxide (3%) weekly to inhibit regrowth.
7. Seasonal Maintenance & Design Integration
Think of your tiled areas as living “garden rooms” requiring regular care:
- Spring Deep Clean: Use your natural grout recipe annually to reset and renew.
- Summer Touch-Ups: Mist grout monthly with a 1:4 vinegar solution to repel mildew.
- Fall Prep: Seal grout lines before cold months to block moisture ingress.
- Winter Check: Inspect for cracks; apply grout filler and repeat cleaning in February.
- Design Elements: Complement clean grout with seasonal rugs, potted plants near tile thresholds, and color-coordinated towels to showcase your care.
8. FAQs
- Q: Can I use this on marble or travertine?
- A: No—acidic ingredients can etch these stones. Use pH-neutral cleaners for natural stone.
- Q: How often should I deep clean?
- A: Annually for heavy-use areas; bi-annually for lower-traffic spaces.
- Q: Will the smell linger?
- A: Vinegar and lemon scents fade within minutes; run fans or open windows for ventilation.
- Q: Can I store leftover solution?
- A: Yes—for up to one week in a sealed bottle. Shake before use to remix ingredients.
- Q: Is it safe around pets and children?
- A: Keep areas off limits until floors are rinsed and dry. Ingredients are non-toxic once rinsed away.