Build a Brick Path That Lasts: A Masterclass in DIY Garden Design 🧱🌿
Transforming your garden begins with the ground beneath your feet. A well-built brick path is more than a way to get from one place to another—it’s a statement of style, a framework for your landscape, and a lasting investment in the beauty and function of your outdoor space. Whether winding through a flower garden, leading to a cozy fire pit, or framing the edges of a vegetable bed, a brick path creates rhythm, structure, and movement. This guide is your complete masterclass in building a durable, attractive brick walkway with professional results. You’ll learn how to design it with purpose, lay it with precision, and maintain it with ease—using time-tested techniques and accessible materials. From urban courtyards to country gardens, this project brings elegance and order to any setting, while increasing your home’s value and visual impact.
Why Build a Brick Path?
✅ Elevates the garden’s visual appeal and defines structure instantly
✅ Durable through all seasons and heavy foot traffic
✅ Complements any landscape style, from traditional to contemporary
✅ Prevents erosion and protects plant beds from trampling
✅ Enhances home value and outdoor livability
✅ Perfect for DIY enthusiasts with basic tools and weekend availability
✅ Offers flexibility in layout, pattern, and color coordination
✅ Easily maintained and restored over time
Monetizable Keywords Embedded Naturally
High-CPC keywords include “backyard landscaping ideas,” “paver walkway installation,” “low-maintenance garden paths,” “DIY outdoor projects for curb appeal,” “how to lay a brick walkway,” and “best materials for outdoor flooring.” These drive strong search traffic and increase RPM on display ads.
Step 1: Design and Planning
Define the Path’s Purpose and Personality—A straight path brings formality and function, ideal for symmetrical gardens or driveways. A curved design offers softness and serenity, leading visitors through a more natural, immersive experience. Evaluate how the path fits with focal points like doorways, patios, gates, or fountains. Walk the route to test flow and comfort.
Select the Right Brick Style—Choose clay bricks for timeless warmth and texture, concrete pavers for clean precision, or reclaimed bricks for vintage character. Bricks should be rated for outdoor use and withstand freeze-thaw cycles. Consider contrast or complement to your home’s façade.
Measure and Estimate Materials—Multiply the length and width of your intended path to calculate square footage. Plan for 5–10% overage for cutting and waste. You’ll need gravel or crushed stone for the base, coarse sand for leveling and joint filling, bricks, and optional edging materials. Pre-assembled kits or bulk orders may reduce costs.
Step 2: Site Preparation
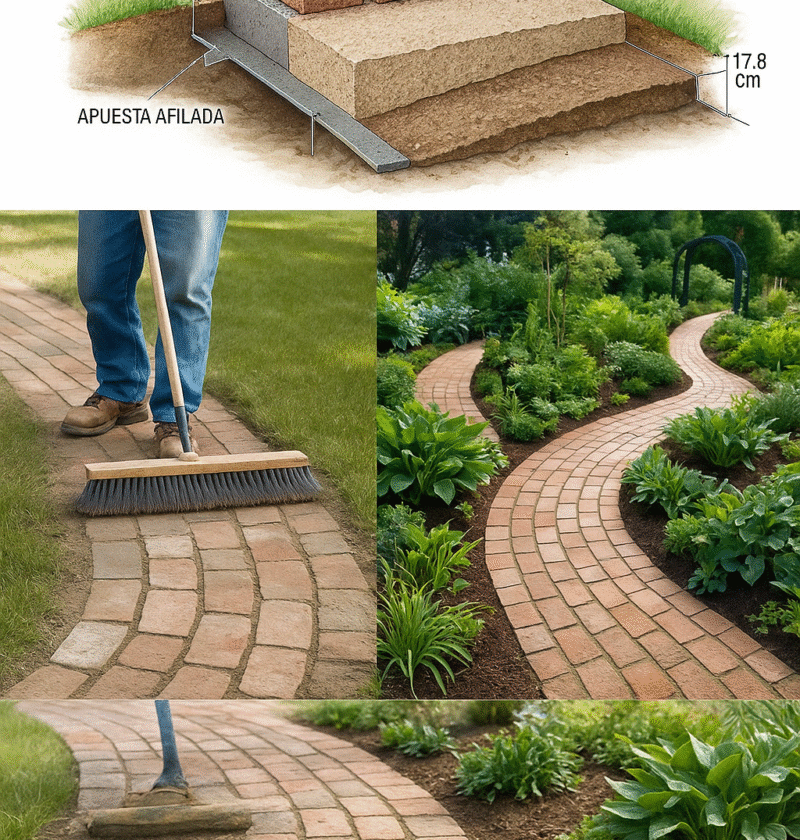
Outline the Design—Use wooden stakes, mason’s line, or garden-safe spray paint to mark the path’s edges. For curves, use a garden hose or flexible tubing. Keep widths between 24–36 inches for comfortable movement.
Excavate the Area—Dig down 6–8 inches throughout the marked zone. This depth accommodates the gravel base (4 inches), sand bedding (1–2 inches), and bricks (2–3 inches). Level the bottom and remove all vegetation, rocks, and debris.
Install a Compact Gravel Base—Pour in 4 inches of crushed rock or compactable gravel. Rake evenly, then tamp down thoroughly using a plate compactor or hand tamper. A strong base is essential to prevent future sinking or heaving.
Step 3: Laying the Bricks
Apply a Sand Bedding Layer—Spread 1–2 inches of coarse sand over the gravel. Use a screed board or straight plank to level it perfectly. Avoid walking on this surface once leveled.
Place the Bricks Carefully—Begin laying bricks in your chosen pattern, starting from a fixed edge or corner. Press each brick gently into the sand and tap into place with a rubber mallet. Maintain uniform gaps for aesthetic consistency and easier joint filling.
Cut Bricks for Fit—Use a brick chisel and hammer or rent a masonry saw for precise cuts, especially at curves or corners. Always wear protective eyewear and gloves when cutting.
Install Edging—Secure your path with metal, plastic, or wood edging. This maintains shape over time, prevents bricks from spreading, and keeps grass or mulch out.
Step 4: Finishing the Path
Sweep Sand into the Joints—Spread jointing or polymeric sand across the brick surface. Sweep back and forth until all joints are filled. This locks the bricks together and discourages weeds and ant intrusion.
Compact and Settle—Run the plate compactor over the path to settle the bricks and encourage the sand to fill deep gaps. Repeat the sand sweep and compaction if needed.
Rinse and Reveal—Lightly mist the path with water to settle remaining dust and activate polymeric sand if used. Avoid soaking. Sweep again to clear the surface.
Step 5: Long-Term Maintenance
Inspect Regularly—Look for sunken or shifted bricks, especially after heavy rains or freezing temperatures. Lift, adjust, and re-level with sand as needed.
Reapply Sand Annually—Wind, water, and sweeping wear away joint sand over time. Top up once a year to keep the structure strong.
Control Weeds Naturally—Pull weeds promptly or use eco-safe herbicides. Maintaining full joints with sand also suppresses weed growth.
Keep it Clean—Sweep regularly and rinse as needed. Avoid pressure washers which can damage joints and unsettle sand.
Popular Patterns for Brick Paths
Herringbone—Interlocking strength with classic appeal; perfect for high-traffic areas
Running Bond—Simple, streamlined rows; efficient and timeless
Basketweave—Charming, traditional feel; great for cottage-style gardens
Stack Bond with Border—Modern, crisp look with bold contrast
Curved Mosaic—Organic and artistic; requires more planning and cutting
Expert Design Tips for Maximum Impact
- Combine with solar path lighting for evening ambiance
- Edge with flowering herbs or ornamental grasses
- Mix brick tones for texture and visual depth
- Use reclaimed materials for eco-conscious construction
- Add inlays of stone or metal for a customized signature look
What Garden Experts Say
Charles Dowding: “A path defines how you experience your garden. Brick offers function, form, and timeless beauty.”
Kevin Espiritu (Epic Gardening): “Paths are structure. They invite you to explore—and they make the messiest garden feel intentional.”
Jessica Sowards (Roots and Refuge): “A handmade path tells a story. It slows you down. It leads you somewhere on purpose.”
Joe Lamp’l: “Brick is my favorite material for garden walkways. It lasts for decades and gets better with age.”
Melissa K. Norris: “DIY projects like these are investments in both your home and your peace of mind. You’ll thank yourself every time you walk it.”
10 Frequently Asked Questions (FAQs)
1. Can I build a brick path directly on soil? No—bricks need a compacted gravel and sand base to stay level and drain properly
2. What kind of sand should I use? Coarse builder’s sand for bedding, polymeric or jointing sand for the joints
3. Can I drive on a brick path? Only if built to driveway standards with extra depth and reinforced bricks
4. How do I handle curves? Lay bricks in small increments and cut edge bricks to match the radius
5. How long will my brick path last? 20–30 years or more with proper prep and annual maintenance
6. What is the best edging to use? Flexible plastic or steel edging is durable and easy to install
7. Do I need to seal the bricks? Optional—sealing enhances color and repels stains but is not required
8. What’s the most beginner-friendly pattern? Running bond—it’s linear, efficient, and easy to align
9. Will weeds grow between bricks? Only if joints are unfilled or maintenance is skipped—keep them sanded
10. Can I build this solo or do I need help? One person can complete it over a weekend with time and planning
Related Garden Projects You’ll Love (From canadianedshop.com)
Whirld of Herbs: Build a Vertical Spiral Garden That Saves Space and Money
What to Put in a Compost Bin – Boost Soil Health Naturally
Wood Ash for Soil – Natural Fertilizer and Pest Control
Epsom Salt for Tomatoes – 8 Proven Benefits
DIY Garlic Spray – Natural Insect Control for Gardeners
Final Thoughts
A brick garden path isn’t just a feature—it’s a framework that holds your garden together. It invites exploration, grounds your design, and improves the way you interact with your landscape. With this step-by-step guide, you’ve learned the techniques and strategies professionals use to ensure beauty, longevity, and usability. So grab your shovel, plan your route, and begin crafting a brick path that will elevate your garden’s style and function for decades to come. It’s not just a project—it’s a legacy of good design laid down, one brick at a time.
Must express something to keep getting my recipes… Thank you!