12 Easy Homemade Fertilizers You Can Make at Home
Table of Contents
- Introduction
- Why Choose Homemade Fertilizers?
- Materials & Tools You’ll Need
- 12 Homemade Fertilizer Recipes
- Banana Peel “Tea” (Potassium Boost)
- Coffee Ground Mulch (Acidity & Nitrogen)
- Eggshell Calcium Powder
- Epsom Salt Magnesium Drench
- Molasses Microbe Stimulant
- Aquarium Water Nutrient Boost
- Wood Ash Mineral Sprinkle
- Gelatin Nitrogen Supplement
- Milk & Water Calcium Feed
- Seaweed Mineral & Hormone Infusion
- Vegetable Scrap Broth
- Weed Tea (Free Nutrient Source)
- Application & Rotation Tips
- Safety & Storage Guidelines
- Pro Tips for Maximum Effectiveness
- Related Articles & Internal Links
- FAQs
- Conclusion
Introduction
Turning kitchen and household “waste” into nutrient-rich plant food is one of the smartest, most sustainable moves you can make in your garden. Not only do homemade fertilizers reduce waste and save money, but they also supply your plants with gentle, balanced nutrition without the synthetic chemicals found in many commercial products. In this 2,500-word deep-dive, you’ll discover step-by-step recipes for 12 easy DIY fertilizers—ranging from banana peel potions to seaweed infusions—plus expert advice on how and when to apply them, safety precautions, pro tips to boost results, internal links for further reading, and a robust FAQ section to answer every question you might have.
Why Choose Homemade Fertilizers?
Homemade fertilizers offer several advantages over store-bought blends:
- Cost-effective: Use materials you already have on hand instead of buying expensive chemical fertilizers.
- Eco-friendly: Recycle organic waste and reduce landfill burden.
- Balanced nutrition: Provide macronutrients (N, P, K) and micronutrients (Ca, Mg, Fe) in natural forms.
- Gentle feeding: Reduce risk of fertilizer burn with slow-release nutrients.
- Soil health: Encourage beneficial microbes and improve structure over time.
Materials & Tools You’ll Need
Before you start, gather these basic supplies:
- Clean buckets or jars with lids
- Fine mesh strainer or cheesecloth
- Garden gloves and apron
- Measuring spoons and cups
- Watering can or spray bottle
- Food scraps (banana peels, eggshells, vegetable scraps, etc.)
- Optional: labels, pH strips
12 Homemade Fertilizer Recipes
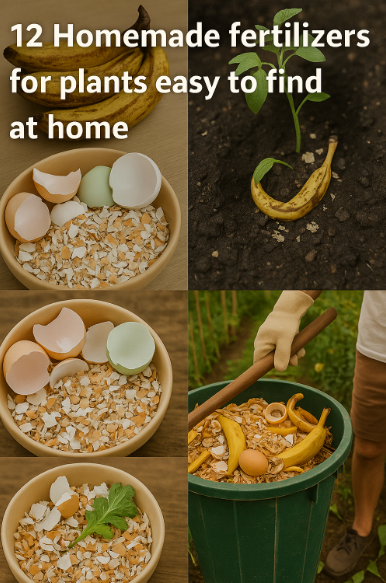
1. Banana Peel “Tea” (Potassium Boost)
Why it works: Banana peels are high in potassium (K), which supports flowering, fruit set, and disease resistance.
- Chop 3-4 ripe banana peels into 1″ strips.
- Soak in 4 cups of non-chlorinated water for 3–5 days, stirring daily.
- Strain out the solids with a mesh strainer.
- Dilute 1:3 with fresh water before applying at the base of plants once every 2–3 weeks.
Best for: Tomatoes, peppers, roses, flowering annuals.
2. Coffee Ground Mulch (Acidity & Nitrogen)
Why it works: Used coffee grounds supply nitrogen (N) and mildly acidify soil for blueberries, azaleas, and other acid-loving species.
- Dry spent grounds on a baking sheet for 24h.
- Sprinkle a thin layer (1/4″) of grounds around the drip line of the plant.
- Lightly work into the top 1″ of soil to prevent crusting.
- Use once per month; avoid overapplication to prevent compaction.
Best for: Blueberries, azaleas, gardenias, rhododendrons.
3. Eggshell Calcium Powder
Why it works: Crushed eggshells are an excellent source of calcium (Ca), preventing blossom-end rot in tomatoes and peppers.
- Rinse clean eggshells to remove residue.
- Bake at 200°F for 10 minutes to sterilize.
- Grind in a spice grinder to a fine powder.
- Mix 1 Tbsp of powder into each planting hole or sprinkle around existing plants and water in.
Best for: Tomatoes, peppers, squash, eggplant.
4. Epsom Salt Magnesium Drench
Why it works: Epsom salt (magnesium sulfate) provides magnesium (Mg) and sulfur (S), essential for chlorophyll production and nutrient uptake.
- Dissolve 1 Tbsp Epsom salt in 1 gallon of water.
- Apply to soil at the base of plants every 4–6 weeks.
- Optional foliar spray: Use 1 tsp per quart of water; mist leaves in early morning.
Best for: Tomatoes, roses, peppers, houseplants showing yellowing leaves.
5. Molasses Microbe Stimulant
Why it works: Unsulfured molasses feeds beneficial soil microbes, enhancing nutrient cycling.
- Mix 2 Tbsp molasses in 1 gallon of warm water.
- Stir until fully dissolved.
- Apply as a root drench at 1 cup per plant every month.
Best for: Vegetable gardens, potted plants, compost pile accelerant.
6. Aquarium Water Nutrient Boost
Why it works: Freshwater aquarium water is rich in nitrogen and trace minerals from fish waste.
- Collect water during tank cleaning.
- Apply directly to soil around plants—no dilution needed.
- Use weekly for continuous gentle feeding.
Best for: Vegetable patches, houseplants, seedlings.
7. Wood Ash Mineral Sprinkle
Why it works: Wood ash supplies potassium and calcium carbonate, raising pH in acidic soils.
- Collect cooled, sifted ash from a wood stove or fireplace.
- Sprinkle ¼ cup per 10 sq ft of garden bed.
- Work lightly into the top 2″ of soil.
- Test soil pH after two weeks; apply only if pH is below 6.5.
Best for: Acidic garden beds, berry patches, annual flowers.
8. Gelatin Nitrogen Supplement
Why it works: Gelatin is a protein that slowly releases nitrogen as it breaks down.
- Dissolve 1 tsp unflavored gelatin in 1 cup hot water.
- Let cool, then dilute in 1 gallon of water.
- Apply as a root drench once per month.
Best for: Leafy greens, ornamentals, seedlings.
9. Milk & Water Calcium Feed
Why it works: Diluted milk provides calcium and a small protein boost, improving cell wall strength.
- Mix 1 part milk to 4 parts water.
- Apply at soil level every 4–6 weeks.
- Avoid foliar application in heat to prevent mildew.
Best for: Tomato plants, peppers, roses.
10. Seaweed Mineral & Hormone Infusion
Why it works: Seaweed is loaded with trace minerals, natural auxins, and cytokinins that stimulate root growth.
- Rinse fresh seaweed to remove salt.
- Chop and pack into a bucket; cover with water.
- Steep for 7–10 days, stirring daily.
- Strain and dilute 1:5 with water; apply monthly.
Best for: Transplants, root crops, container plants.
11. Vegetable Scrap Broth
Why it works: Boiled vegetable scraps leach nutrients—nitrogen, phosphorus, potassium—into a gentle broth.
- Collect veggie scraps (carrot tops, potato peels, leafy ends).
- Boil in 2 gallons of water for 20 minutes.
- Cool and strain solids.
- Use undiluted as a soil drench every 2 weeks.
Best for: Flower beds, vegetable gardens.
12. Weed Tea (Free Nutrient Source)
Why it works: Common weeds like dandelion and chickweed are nutrient accumulators. Steeping them yields a potent tea rich in nitrogen and trace elements.
- Harvest young, non-flowering weeds; avoid invasive species seeds.
- Chop and place in a porous bag in a bucket of water.
- Steep for 7–10 days, stirring daily.
- Strain and dilute 1:5; apply every 3 weeks.
Best for: Established gardens, rose bushes, shrubs.
Application & Rotation Tips
To avoid nutrient imbalances and salt buildup:
- Rotate between 1–2 fertilizer types each month rather than applying all at once.
- Observe plant response; yellowing leaves often indicate nitrogen deficiency, while blossom-end rot signals calcium shortage.
- Water thoroughly after application to help nutrients penetrate the root zone.
- Test soil pH bi-annually—adjust with lime or sulfur if readings fall outside 6.0–7.0.
Safety & Storage Guidelines
- Label all homemade brews with date and contents; discard after 2 weeks to prevent rancidity.
- Store solids (egg shells, ash) in airtight containers to deter pests.
- Wear gloves when handling any fermenting mixtures to avoid skin irritation.
- Rinse sprayers thoroughly to prevent cross-contamination.
Pro Tips for Maximum Effectiveness
- Use tepid water for infusions—cold slows microbial activity, hot can kill beneficial microbes.
- Monitor leaves for signs of overfeeding: brown leaf edges often indicate salt buildup.
- Combine Molasses and Banana Peel Tea in alternate months to feed microbes and boost potassium simultaneously.
- Apply liquid fertilizers in the early morning or late afternoon to reduce evaporation and leaf burn.
- Keep pH strips handy: many homemade teas can drift acidic or alkaline—aim for 6.0–7.0 for most plants.
Related Articles & Internal Links
- Composting 101: Turn Waste into Black Gold
- Natural Pest Control Strategies for Your Vegetable Garden
- Efficient Irrigation: Drip, Soaker Hoses & Rainwater Harvesting
- Soil pH Adjustment: Lime & Sulfur Applications Explained
Frequently Asked Questions (FAQs)
- Q1: Can I mix multiple homemade fertilizers together?
- A: It’s best to apply one or two at a time. Mixing too many can create nutrient imbalances or overly strong solutions that harm roots.
- Q2: How often should I test my soil?
- A: Aim for at least twice per year—early spring and mid-fall—to track nutrient levels and pH changes.
- Q3: Are these fertilizers safe for edibles?
- A: Yes—when used as directed. Always rinse produce before eating, and avoid any mixtures that have begun to spoil.
- Q4: Can I use ocean seaweed?
- A: Only if you rinse thoroughly to remove excess salt. Salt buildup can damage plants.
- Q5: What if my homemade fertilizer starts to smell bad?
- A: Discard any brew that smells rotten or ammonia-like. Freshness is key to beneficial microbial activity.
Conclusion
With these 12 easy homemade fertilizers, you’ll not only reduce kitchen waste but also nourish your garden naturally and economically. Experiment with each recipe, observe how your plants respond, and adjust frequency and concentration as needed. Over time, these DIY solutions will improve your soil’s structure, feed beneficial microbes, and help you grow healthier, more productive plants—without chemicals or hefty price tags. Happy gardening! 🌱