How to Pre-Germinate Vegetable Seeds 🌱
Nothing beats the thrill of seeing your first seedlings emerge—especially when you know you gave them the best possible start. Pre-germinating vegetable seeds is like giving your garden a head start, ensuring every seed you plant has the highest chance of success. Whether you’re dealing with older seeds or simply want to speed up germination, this simple technique can transform your seed-starting game.
In this ultra-detailed guide, you’ll learn why pre-germination matters, step-by-step instructions to get sprouts popping, insider tips to avoid common pitfalls, and answers to all your burning FAQs. Ready to watch those tiny roots unfurl and spring into life? Let’s dive in.
Why Pre-Germinate Your Seeds?
- Boost Germination Rates: Older or low-viability seeds often struggle. Pre-germination identifies viable seeds before planting.
- Reduce Failure: Avoid soggy soil and wasted space by only planting seeds that have already sprouted.
- Speed Up Growth: Seeds with visible roots establish faster once transferred to soil.
- Perfect for Fall Planting: Extend your growing season by pre-germinating in late summer for autumn gardens.
Materials You’ll Need
- Vegetable seed packets (peas, beans, lettuce, tomatoes, peppers, etc.)
- Clean water in a bowl or jar
- Paper towels, coffee filters, or clean napkins
- Zip-lock bags or plastic containers with lids
- Labels and pen to mark seed varieties
- Warm surface (top of fridge, heating mat, or sunny windowsill)
Step-by-Step Guide to Pre-Germinate Seeds
-
Soak the Seeds
Place your seeds in a bowl of lukewarm water and soak for 1–2 hours. Larger seeds like peas or beans may benefit from up to 4 hours of soaking to soften their coats. -
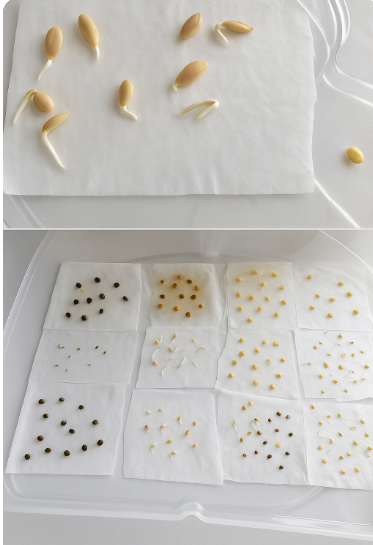
Prepare the Paper Towel
Lay a damp (not dripping) paper towel on a flat surface. Gently shake off excess water from the seeds and space them evenly—about 1 inch apart—to prevent tangling. -
Seal and Label
Fold the towel over the seeds or cover them with a second damp towel. Place the assembly inside a zip-lock bag or lidded container. Label each bag with the seed type and date. -
Create the Right Environment
Keep the bags in a warm spot (70–85°F / 21–29°C) such as atop your refrigerator, on a seed-starting heat mat, or near a sunny window. Ensure slight air circulation to prevent mold—crack the bag open once daily. -
Monitor for Sprouts
Check daily. Within 2–7 days, you’ll see tiny white root tips (radicles) emerging. Once roots are 1/4–1/2 inch long, they’re ready for transplant. -
Transplant Carefully
Moisten your potting mix or garden bed. Use tweezers or your fingers to transfer each sprouted seed—root down—into soil about 1–2 times deeper than the root length. Gently firm soil around the seed and water lightly.
Troubleshooting & Pro Tips
- Prevent Mold: Avoid over-saturating towels; they should be damp, not wet. Allow brief daily air exchanges.
- Label Religiously: With multiple varieties, clear labels save confusion and re-germination efforts.
- Use Fresh Water: Change soaking water every 24 hours to discourage bacterial growth.
- Heat Mat Hack: A seed-starting heat mat can shave days off germination for heat-loving crops like peppers.
- Don’t Overcrowd: Too many seeds in one bag can tangle roots—opt for one variety per bag or container.
10 FAQs About Pre-Germinating Seeds
- Can I pre-germinate any vegetable seed?
Most garden seeds work, but avoid very fine seeds (e.g., carrots) as they’re hard to handle. Instead, sow fine seeds directly in soil. - How long can I wait before planting sprouted seeds?
Plant within 12–24 hours of root emergence to prevent root damage or drying out. - Will pre-germinated seeds rot underground?
No—once in soil, healthy radicles quickly establish and anchor into the medium. - Do I need special lights?
Natural sunlight works—aim for 12–16 hours of light daily. Consider grow lights for indoor starts during low-light months. - Can I refrigerate sprouted seeds?
No—cold slows growth and may kill tender roots. Keep them warm until transplant. - Is this method viable for heirloom seeds?
Absolutely—pre-germination helps older heirloom stocks regain vigor. - What if some seeds never sprout?
Discard duds and replace with fresh seeds to maintain bed density. - Can I skip the soaking step?
Soaking accelerates germination but isn’t strictly necessary. Skip only for very small seeds. - How do I avoid root injury?
Handle sprouts by their seed coat, not the delicate root tip. Use tweezers if needed. - Can I pre-germinate flower seeds the same way?
Yes—apply identical steps for many annual flowers. Check each variety’s sprout time.
Further Reading & Related Gardening Projects
- Ultimate Indoor Seed-Starting Guide
- Companion Planting for Healthier Vegetables
- Top 5 Organic Fertilizers for Your Veggie Patch
- Season Extension Techniques for Cold Climates