🌹 How to Propagate Roses from Cuttings: A Simple, Foolproof Guide
Dreaming of endless rose blooms from a single beloved bush? Propagating roses from cuttings is one of the most rewarding—and surprisingly easy—gardening projects you can tackle. With minimal tools and a bit of patience, you’ll soon have new rose plants ready to grace your garden.
In this guide, we’ll walk you through every step:
- What You’ll Need
- 1. Choose Your Cutting
- 2. Trim the Cutting
- 3. Apply Rooting Hormone
- 4. Plant the Cutting
- 5. Create Humidity
- 6. Maintain Moisture & Warmth
- 7. Check for Roots
- 8. Transplant Your New Rose
- 🌿 Pro Tips for Success
- ❓ FAQs
- 🔗 Related Articles
✂️ What You’ll Need
- Healthy rose stem (cutting of 6–8 inches)
- Sharp pruning shears or knife
- Rooting hormone (optional but boosts success)
- Small pot or prepared planting area
- Well-draining potting mix or garden soil
- Clear plastic bag or cut plastic bottle
- Water (spray bottle recommended)
1. Choose Your Cutting
🔍 Select a healthy, recently bloomed stem about 6–8 inches long. It should be firm, green (not woody), with several leaf nodes.
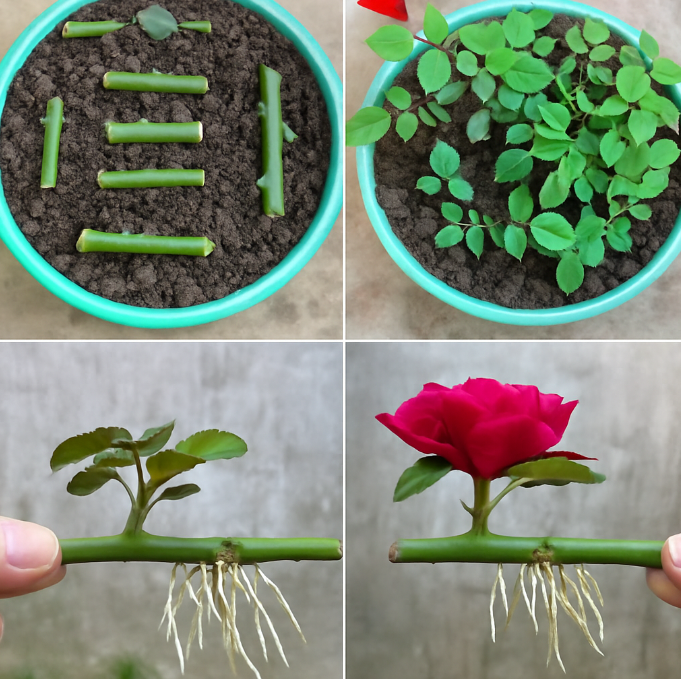
2. Trim the Cutting
- Cut just below a leaf node at a 45° angle.
- Remove any flowers or buds to direct energy to root development.
- Strip off the lower leaves, leaving 2–3 sets of leaves at the top.
3. Apply Rooting Hormone (Optional)
🌱 Dip the base of your cutting into rooting hormone powder or gel. Tap off excess. This accelerates root formation and improves success rates.
4. Plant the Cutting
- Fill your pot with moist, well-draining mix.
- Use a pencil to make a hole ~2–3 inches deep.
- Gently insert the cutting, burying at least two nodes.
- Firm the soil around the stem to eliminate air pockets.
5. Create Humidity
💧 Cover with a clear plastic bag or the top of a cut plastic bottle to form a mini greenhouse. This traps moisture and prevents the cutting from drying out.
6. Maintain Moisture & Warmth
- Place in bright, indirect light—avoid direct sun.
- Keep soil damp (not soggy) by misting or bottom-watering.
- Ideal temperature: 65–75°F (18–24°C).
7. Check for Roots
⏳ After 3–6 weeks, gently tug the cutting. If you feel resistance, roots have formed. Carefully remove the cover and inspect for healthy white roots.
8. Transplant Your New Rose
🌹 Once roots are 2–3 inches long and new leaf growth appears, transplant into a larger pot or garden bed. Harden off by gradually exposing to outdoor conditions over 7–10 days.
🌿 Pro Tips for Success
- Take cuttings early morning when stems are fully hydrated.
- Propagate in spring or early summer for best root development.
- Sanitize tools between cuts to prevent disease spread.
- Label your pots with variety and date to track progress.
❓ FAQs
Q: Can I propagate any rose variety?
A: Most varieties root well from hardwood or softwood cuttings, but some grafted roses may revert to rootstock traits.
Q: How often should I water the cutting?
A: Keep the soil consistently moist—check daily and mist the cutting if the bag shows condensation loss.
Q: What if my cutting wilts?
A: Reduce direct light, ensure humidity is high, and let the soil dry slightly between waterings to prevent rot.
Q: Do I need to remove the plastic cover eventually?
A: Yes—once roots form and leaves look vibrant, gradually remove the cover over a week to toughen the new plant.
🔗 Related Articles
- Softwood & Hardwood Cuttings: Step-By-Step Guide
- Top Propagation Techniques for Every Gardener
- Essential Rose Care Tips for Vibrant Blooms
- How to Improve Garden Soil Naturally
- Organic Composting 101: Speed Up Decomposition
🚀 Ready to Grow Your Rose Army?
Grab a pair of pruners and a healthy stem—your garden’s next generation of roses awaits. Share your successes below and inspire other gardeners! 🌹✨