Unlocking Soil Potential: How to Use Biochar for Maximum Farm Yield
Introduction: The Secret Weapon for Smart Farming
In the world of sustainable agriculture, biochar is quickly becoming a buzzword — and for good reason. This carbon-rich, eco-friendly soil amendment has been used for centuries to improve soil health, increase crop productivity, and reduce environmental impact. Yet, many farmers still don’t realize the full potential that biochar holds.
Whether you run a large farm or tend a small backyard garden, adding biochar to your soil can significantly increase moisture retention, enhance microbial activity, and boost long-term fertility. Best of all, it’s easy to make at home with low-cost materials — making it a perfect fit for the DIY farming movement.
In this article, we’ll dive deep into:
What biochar is and how it works
The step-by-step DIY method to create biochar
How to apply it to different types of soil
Proven benefits for crops and the environment
Tips to maximize results with minimal effort
Let’s unlock the black gold beneath your soil!
—
What Is Biochar? Understanding the Basics
Biochar is a type of charcoal produced by heating organic material (like wood chips, cornstalks, or coconut shells) in a low-oxygen environment — a process called pyrolysis. Unlike ash or regular burnt debris, biochar retains a porous, carbon-rich structure that traps nutrients and improves soil quality for years.
Key Characteristics of Biochar:
Highly porous: Helps retain water and nutrients
Stable carbon form: Can last in the soil for centuries
Microbe-friendly: Creates a habitat for beneficial bacteria and fungi
Carbon sequestration tool: Helps reduce greenhouse gases
—
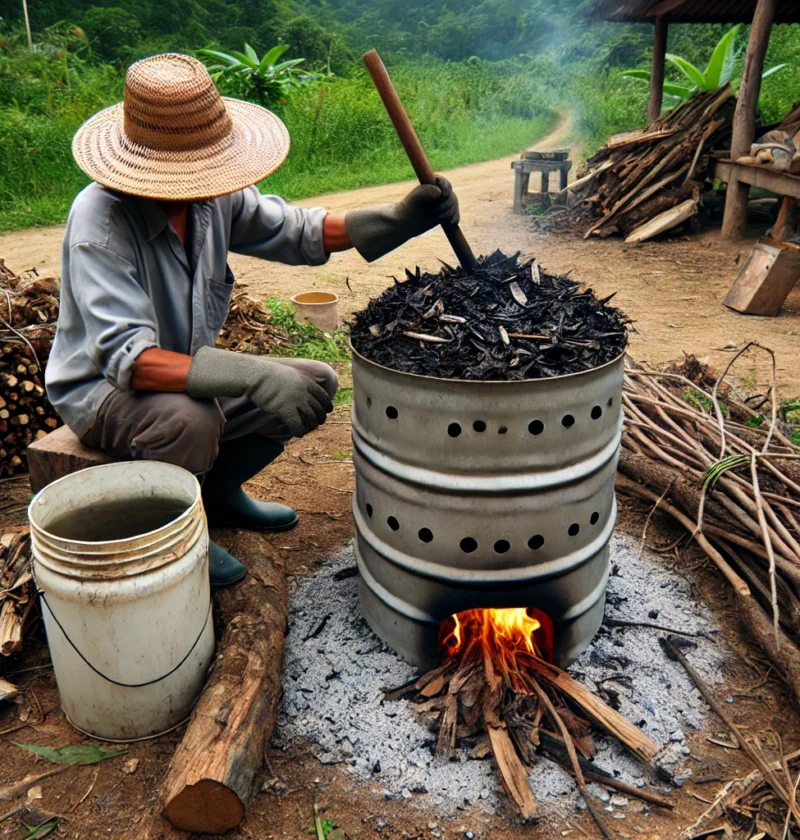
DIY Guide: How to Make Biochar at Home (With Safety in Mind)
One of the best parts about biochar is that it can be made easily and inexpensively, using materials most farmers or homesteaders already have. Follow this safe and simple method to produce your own batch.
Materials Needed:
A metal drum with a lid (used as a burn chamber)
Dried organic materials like:
Wood chips
Cornstalks
Branches
Coconut shells
A shovel
Firestarter (charcoal, dry leaves, or small twigs)
Water bucket for safety
Metal grate (optional, helps regulate airflow)
—
Step-by-Step Instructions:
Step 1: Choose a Safe Location
Select a clear outdoor area far from buildings, trees, or flammable materials. Wear gloves and avoid breathing in smoke during the process.
Step 2: Prepare the Metal Drum
If it’s a closed drum, punch small holes at the bottom for oxygen flow.
For open drums, you can use a metal grate on top to partially cover the material as it burns.
Step 3: Load the Drum
Fill the drum with dried organic materials in loose, layered form — avoid packing them tightly. This allows even burning and optimal airflow.
Step 4: Light the Fire
Start a small fire at the bottom using firestarter. Once burning, reduce airflow to create a low-oxygen burn — this prevents full combustion and creates char instead of ash.
When the flames die down and glowing embers remain, partially cover the drum to cut off most of the air supply.
Step 5: Let it Cool
Once the fire is completely out, allow the drum and contents to cool naturally. Do not douse with water, as that may damage the biochar structure.
Step 6: Crush the Biochar
After cooling, use a shovel or mallet to crush the char into small granules. This increases surface area, allowing it to hold more nutrients and interact better with the soil.
Step 7: Activate the Biochar
Before adding it to your fields or garden, soak the crushed biochar in compost tea or liquid manure for 3–7 days. This process “charges” it with beneficial nutrients and microbes.
Step 8: Mix with Soil
Blend the activated biochar into your soil at a 10–20% ratio. Too much can dry out soil initially, so start small and observe your plant response.
—
Would you like me to continue building the next sections?
“Benefits of Using Biochar on Farms”
“Best Biochar Application Methods by Soil Type”
“Common Mistakes to Avoid When Using Biochar”
“Success Stories from Farmers Around the World”
“Conclusion + CTA”
Let me know if you want it all in one go or section by section!