Growing your own juicy watermelons at home is easier than you think! Even if you don’t have a garden, you can cultivate delicious watermelons in containers right on your balcony, patio, or even indoors. With the right setup and a little care, you’ll be harvesting your own sweet melons in no time! Let’s dive into the step-by-step guide to growing watermelons in containers.
—
Why Grow Watermelons in Containers?
Watermelon plants typically require a lot of space, but with proper planning, they can thrive in containers. Here are a few reasons why container gardening is a great option:
✔ Space-Saving: Ideal for balconies, patios, and urban gardens.
✔ Easy Maintenance: Better control over soil quality, watering, and pests.
✔ Portability: Move plants to get the best sunlight exposure.
✔ Faster Growth: Containers warm up faster than garden soil, helping seeds sprout sooner.
—
Step-by-Step Guide to Growing Watermelons in Containers
1. Choose the Right Container 🏺
Selecting the right container is crucial for healthy plant growth.
✅ Use a large container that is at least 18 inches (45 cm) in diameter and 16 inches (40 cm) deep to allow space for roots.
✅ Make sure the container has good drainage holes to prevent root rot.
✅ Consider using fabric grow bags or plastic pots for better air circulation and moisture retention.
💡 Tip: A 5-gallon or larger container is ideal for one plant.
—
2. Select the Best Watermelon Variety 🍉
Since watermelons have long vines, it’s best to choose small or bush varieties suited for containers. Some great options include:
✔ Sugar Baby: A compact variety that produces sweet, small watermelons (8-10 lbs).
✔ Mini Love: High-yielding and perfect for small spaces.
✔ Bush Sugar Baby: Compact vines with flavorful, small melons.
✔ Golden Midget: Produces yellow-skinned, pink-fleshed fruits quickly.
💡 Tip: If space is extremely limited, look for dwarf watermelon varieties that require less vine spread.
—
3. Prepare the Soil for Optimal Growth 🌱
Watermelons thrive in loose, well-draining soil that is rich in organic matter.
✅ Use a high-quality potting mix (avoid garden soil, as it compacts easily in pots).
✅ Mix in compost or aged manure to enhance nutrients.
✅ Maintain a pH between 6.0 – 6.8 for the best results.
💡 Tip: Adding perlite or sand improves drainage and aeration.
—
4. Plant the Watermelon Seeds or Seedlings 🌱
✅ Direct sowing: Plant 2-3 watermelon seeds 1 inch deep into the soil, spaced about 4 inches apart.
✅ Starting indoors: If planting early, start seeds indoors 2-4 weeks before the last frost and transplant when seedlings are about 3-4 inches tall.
✅ Thin the plants: Once seedlings sprout, remove the weaker ones and keep the strongest seedling per pot.
💡 Tip: To speed up germination, soak seeds in warm water for 24 hours before planting.
—
5. Water Consistently 🚰
Watermelons need consistent moisture, especially when the plants are young and during fruit development.
✔ Water deeply but avoid overwatering.
✔ Keep the soil evenly moist but not soggy.
✔ Use mulch (straw or wood chips) around the base to retain moisture.
✔ Reduce watering slightly when fruits start forming to enhance sweetness.
💡 Tip: Water early in the morning to minimize evaporation.
—
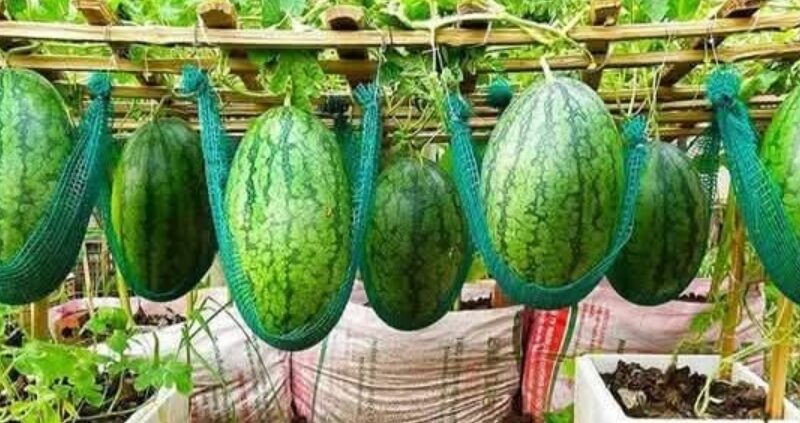
6. Provide Support for the Vines 🍃
Watermelon vines love to spread, and in a small space, they need vertical support to grow properly.
✔ Install a sturdy trellis or wire cage for vines to climb.
✔ Use soft ties or fabric strips to train vines upwards.
✔ If growing large melons, use a hammock (nylon or mesh) to support the fruit on the trellis.
💡 Tip: Compact or bush varieties won’t need much trellising, but trailing types do.
—
7. Fertilize Regularly for Maximum Growth 🌿
Watermelons are heavy feeders and need a balanced diet.
✔ Use a balanced fertilizer (10-10-10) every 3-4 weeks during growth.
✔ When flowers appear, switch to a phosphorus-rich fertilizer (5-10-10) for better fruit production.
✔ Add organic fertilizers like compost tea, fish emulsion, or liquid seaweed for extra nutrients.
💡 Tip: Avoid excess nitrogen once fruiting begins—it can lead to more leaves and fewer melons.
—
8. Pollination: Ensuring Fruit Development 🌼
Watermelons rely on pollination to develop fruit. If growing indoors or in low-pollinator areas, you may need to hand-pollinate.
✔ Identify male and female flowers (female flowers have a small fruit at the base).
✔ Use a small brush or cotton swab to transfer pollen from male to female flowers.
✔ Repeat this process each morning for the best results.
💡 Tip: Attract pollinators like bees by planting marigolds, lavender, or basil nearby.
—
9. Monitor for Pests & Diseases 🦟🚨
Container-grown watermelons face fewer pest problems, but here are some to watch for:
🐞 Aphids & Spider Mites: Use insecticidal soap or neem oil.
🐌 Slugs & Snails: Keep containers elevated or use diatomaceous earth.
🍃 Powdery Mildew: Provide good air circulation and avoid watering the leaves.
🌱 Blossom End Rot: Ensure consistent calcium levels (add crushed eggshells or bone meal).
💡 Tip: Regularly inspect plants and remove any damaged leaves.
—
10. Harvesting: Enjoy Your Homegrown Watermelon 🍉🎉
Watermelons are ready to harvest in 75-100 days after planting, depending on the variety. Here’s how to know when they’re ripe:
✔ The tendril closest to the fruit turns brown and dries up.
✔ The bottom (belly) of the watermelon turns yellow or cream-colored.
✔ When tapped, the watermelon should produce a deep, hollow sound.
💡 Tip: Avoid picking too early! Once harvested, watermelons won’t ripen further.
—
Final Thoughts: Start Growing Watermelons Today! 🌿🍉
Growing watermelons in containers is a fun, rewarding, and space-saving way to enjoy fresh, juicy melons. By following these steps—choosing the right container, proper watering, fertilizing, and providing support—you’ll maximize growth and ensure a sweet and abundant harvest.
Now it’s your turn! Grab a pot, pick your favorite watermelon variety, and start growing delicious melons right at home!
💬 Have you tried growing watermelons in containers? Share your experience in the comments! 🍉🌱