How to Make a Homemade Vermicomposter: A Step-by-Step Guide for Sustainable Composting
Vermicomposting is an eco-friendly and efficient way to recycle kitchen scraps and organic waste into nutrient-rich compost using worms. This homemade vermicomposter setup is cost-effective, simple to assemble, and perfect for urban gardeners. Follow this step-by-step guide to build your own worm composting system at home.
—
Why Vermicomposting?
🌱 Reduces kitchen waste by converting scraps into valuable compost.
🌱 Creates nutrient-rich fertilizer (worm castings) for plants.
🌱 Produces liquid fertilizer (worm tea) that improves soil health.
🌱 Requires minimal space and can be set up indoors or outdoors.
—
Materials Needed for a DIY Vermicomposter
To build your own worm composting system, you’ll need:
✔️ Three durable plastic totes (Roughneck brand recommended for durability)
✔️ One lid (to cover the bins)
✔️ A cooler drain or spigot (for drainage)
✔️ A drill with a quarter-inch bit (for aeration holes)
✔️ Bricks or blocks (to elevate the system)
✔️ Red wiggler worms (Eisenia fetida, best for composting)
✔️ Bedding material (shredded newspaper, coconut coir, or cardboard)
✔️ Kitchen scraps (fruit and vegetable peels, coffee grounds, eggshells)
—
Step-by-Step Guide to Building a Vermicomposter
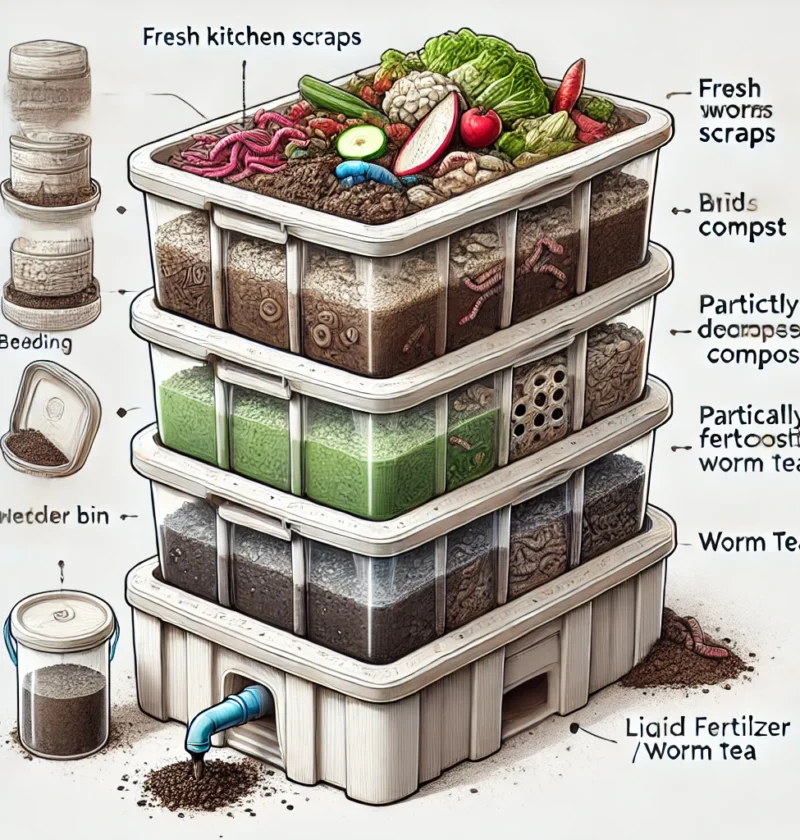
Step 1: Preparing the Totes
🔹 Take two of the three plastic totes and drill quarter-inch holes across the bottom. These holes allow worms to move freely between layers and ensure proper drainage.
🔹 Drill holes around the upper edges of the totes for adequate airflow. Worms need oxygen to thrive, and aeration prevents foul odors.
—
Step 2: Setting Up the Drainage System
🔹 The third tote will act as a drainage collector, where excess liquid, known as worm tea, will collect.
🔹 Install a cooler drain or spigot at the bottom to easily drain worm tea, which is a powerful organic fertilizer.
🔹 Stack the two drilled totes above this drainage bin.
—
Step 3: Assembling the Vermicomposter
🔹 Stack the two drilled totes on top of the drainage bin.
🔹 The top tote will be the active composting bin, where worms and food scraps go.
🔹 The middle tote will collect finished compost as worms migrate upwards.
—
Step 4: Adding Worms & Bedding
🔹 Place shredded newspaper, coconut coir, or damp cardboard in the top tote. This acts as bedding and keeps the worms comfortable.
🔹 Add a handful of soil to introduce beneficial microbes.
🔹 Carefully transfer red wiggler worms into the top tote, along with a small amount of food scraps.
—
Step 5: Feeding the Worms
🔹 Add kitchen scraps in small amounts (fruit peels, coffee grounds, eggshells).
🔹 Avoid meat, dairy, oily foods, and citrus peels, as they can attract pests or harm the worms.
🔹 Bury food scraps under bedding to prevent odor and fruit flies.
🔹 Feed the worms once or twice a week, depending on how quickly they consume food.
—
Step 6: Maintaining the Vermicomposter
✔️ Keep the compost moist but not soggy—if too wet, add dry bedding like shredded newspaper.
✔️ Check for proper ventilation—if it smells bad, add more airflow or dry bedding.
✔️ Rotate food placement—so worms move around and process evenly.
✔️ Harvest worm tea from the bottom tote once a week and dilute it 1:10 with water for plants.
—
Step 7: Harvesting Worm Castings (Compost)
✔️ When the top tote is full of compost, shift it to the middle position, allowing a fresh bin to be placed on top.
✔️ The worms will migrate upward into the new food layer, leaving rich compost in the middle tote.
✔️ Remove finished compost and use it in your garden to boost soil health.
—
Tips for a Healthy Vermicomposter
✔️ Keep the bin in a cool, shaded place (55-77°F or 13-25°C) to avoid overheating.
✔️ If worms try to escape, check moisture levels and aeration.
✔️ Use worm tea weekly as a liquid fertilizer for plants.
✔️ Add crushed eggshells occasionally to balance pH.
—
Final Thoughts: Start Your Own Vermicomposting Journey!
Building a homemade vermicomposter is a simple, cost-effective, and eco-friendly way to reduce kitchen waste and enrich your garden soil. Whether you live in an apartment or have a backyard, this compact system makes composting easy and rewarding.
🔥 Get started today and transform your kitchen waste into organic gold! 🔥
💬 What do you think of this vermicomposting setup? Have you tried it before? Share your experience below! 🌱♻️