Ginger is a flavorful and medicinal root that can be easily grown at home with the right techniques. By growing ginger indoors or in your garden, you ensure a continuous supply of fresh ginger while saving money.
Follow this step-by-step guide to cultivate healthy, high-yielding ginger plants in your own space.
—
H2: Why Grow Ginger at Home?
Growing ginger at home provides several benefits:
✅ Fresh and organic supply – No chemicals or pesticides.
✅ Cost-effective – A single rhizome can multiply over time.
✅ Low maintenance – Ginger thrives in warm, humid environments.
✅ Perennial growth – You can harvest continuously from the same plant.
With minimal effort, you can have homegrown ginger all year round!
—
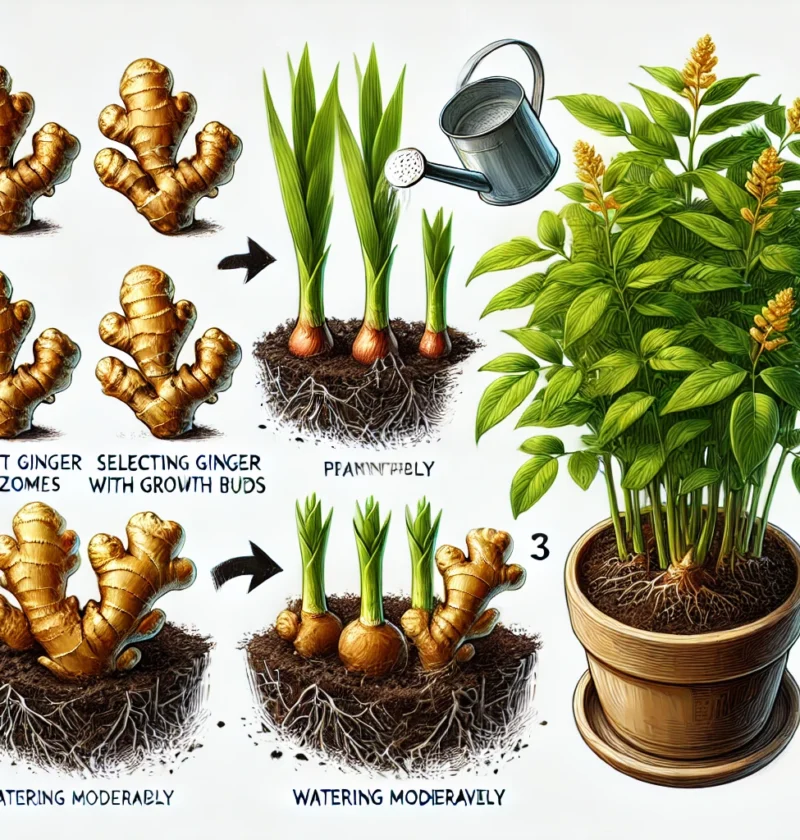
H2: Step 1 – Choosing the Right Ginger Rhizomes 🌿
Selecting high-quality ginger rhizomes is crucial for success. Look for:
Organic ginger (non-treated for growth suppression).
Plump rhizomes with smooth skin and multiple growth points (buds).
Firm texture – Avoid shriveled or moldy ginger.
💡 Tip: If your ginger has no visible buds, place it in a warm, humid place for a few days until small sprouts emerge.
—
H2: Step 2 – Preparing the Ideal Pot and Soil Mix 🏺
Choosing the Right Pot
Use wide and deep pots (at least 12 inches deep).
Ensure good drainage – Ginger does not tolerate waterlogged soil.
Add clay pebbles at the bottom to prevent excess moisture.
Best Soil for Ginger
Use light, well-draining soil mixed with organic compost.
Mix potting soil with river sand (for aeration and drainage).
Ginger prefers a slightly acidic to neutral pH (6.0-7.0).
💡 Tip: Add coconut coir or peat moss to retain moisture without compacting the soil.
—
H2: Step 3 – Planting the Ginger Rhizomes 🌱
1️⃣ Positioning: Lay the ginger rhizome horizontally in the soil with buds facing upward.
2️⃣ Spacing: Keep at least 6 inches apart between each piece.
3️⃣ Depth: Cover with 1-2 inches of soil, leaving some rhizome partially exposed.
4️⃣ Watering: Lightly water after planting to keep the soil moist but not soggy.
💡 Tip: Avoid deep planting, as ginger grows near the surface and needs warmth for sprouting.
—
H2: Step 4 – Providing Optimal Growing Conditions ☀️
Ginger needs warm and humid conditions to thrive.
1. Light Requirements
Ginger prefers indirect sunlight or partial shade.
6-8 hours of filtered sunlight is ideal.
Avoid direct midday sun, which can dry out the soil.
2. Temperature and Humidity
Ideal growing temperature: 75°F to 85°F (24°C to 29°C).
Ginger does not tolerate frost – Keep it indoors or in a greenhouse in colder climates.
Maintain high humidity by misting or using a humidifier.
3. Watering Needs 💦
Keep the soil consistently moist, but avoid overwatering.
Water deeply once or twice a week, depending on climate.
Reduce watering once the plant matures (after 5 months).
💡 Tip: To prevent fungal issues, water only at the base and avoid wetting the leaves.
—
H2: Step 5 – Fertilizing for Faster Growth 🌿✨
Ginger is a nutrient-hungry plant that benefits from organic feeding.
Best Fertilizers for Ginger
✅ Compost or well-rotted manure – Boosts soil fertility.
✅ Liquid seaweed or fish emulsion – Encourages leafy growth.
✅ Banana peel or wood ash tea – Provides potassium for healthy rhizomes.
💡 Tip: Feed every 3-4 weeks during active growth. Reduce fertilizing 2 months before harvest to enhance ginger flavor.
—
H2: Step 6 – Preventing Pests and Diseases 🐛
Ginger is relatively pest-resistant, but watch out for:
Mealybugs & aphids – Use neem oil or insecticidal soap.
Root rot – Avoid overwatering and ensure proper drainage.
Fungal infections – Apply cinnamon powder as a natural fungicide.
💡 Tip: Aerate the soil every few weeks to prevent mold growth and improve drainage.
—
H2: Step 7 – When and How to Harvest Ginger 🌾
When to Harvest
For young, tender ginger: Harvest after 6 months (milder flavor).
For mature, spicier ginger: Wait 9-10 months when leaves turn yellow and dry.
How to Harvest Ginger
1️⃣ Carefully loosen the soil around the rhizomes.
2️⃣ Gently pull out the plant, shaking off excess dirt.
3️⃣ Cut only a portion of the rhizome, leaving some for regrowth.
4️⃣ Replant a small section for continuous harvesting.
💡 Tip: Freshly harvested ginger doesn’t need peeling – its skin is thin and fragrant!
—
H2: How to Store and Use Homegrown Ginger 🍛
1. Storing Fresh Ginger
Refrigerate in an airtight container for up to 3 weeks.
Freeze whole ginger rhizomes for 6 months.
2. Drying Ginger for Long-Term Use
Slice thinly and sun-dry or dehydrate at 100°F (40°C).
Grind into ginger powder for use in tea, cooking, and medicine.
3. Making Ginger Tea 🍵
Boil fresh ginger slices in hot water for 10 minutes.
Add honey and lemon for a soothing tea.
—
H2: Common Mistakes to Avoid When Growing Ginger ❌
🚫 Overwatering – Leads to root rot. Keep soil slightly moist, not wet.
🚫 Planting too deep – Ginger prefers shallow planting.
🚫 Too much direct sunlight – Can scorch leaves.
🚫 Skipping fertilization – Limits growth and rhizome size.
🚫 Harvesting too early – Young ginger is mild, but mature ginger has stronger flavor.
💡 Tip: Follow the right growing cycle for best results!
—
H2: Conclusion – Enjoy Your Homegrown Ginger Year-Round! 🎉
Growing ginger at home is simple, rewarding, and cost-effective. With proper planting, watering, and care, you can enjoy an endless supply of fresh ginger for cooking, tea, and health benefits.
Key Takeaways:
✅ Choose organic ginger with growth buds
✅ Plant in deep pots with well-draining soil
✅ Provide warmth, humidity, and indirect sunlight
✅ Fertilize regularly for better yields
✅ Harvest mature ginger after 9-10 months
Start your ginger-growing journey today, and never run out of fresh, organic ginger again! 🌱💛
📢 Have you grown ginger at home before? Share your experience in the comments below! 🚀