No Need to Buy Garlic at the Store – Grow It Easily at Home Using Plastic Bottles!
Imagine never needing to buy garlic again—instead, growing fresh, organic garlic right in your kitchen or balcony using simple plastic bottles. This urban farming hack is perfect for city dwellers, saving space, money, and reducing waste while enjoying the culinary and medicinal benefits of garlic.
In this guide, you’ll learn:
✅ How to grow garlic at home using plastic bottles
✅ Essential steps to ensure healthy garlic growth
✅ How to care for garlic sprouts and transplant them to soil
✅ The sustainability benefits of this eco-friendly method
By the end, you’ll be ready to grow your own garlic effortlessly!
—
Why Grow Garlic at Home?
Garlic (Allium sativum) is one of the most versatile plants in the kitchen and for health. Growing your own garlic means you can:
✔ Save money – No more store-bought garlic.
✔ Have a continuous supply – Harvest fresh garlic year-round.
✔ Enjoy organic, chemical-free garlic – Control how it’s grown.
✔ Make use of small spaces – Perfect for balconies, kitchens, or small gardens.
✔ Support sustainable gardening – Reuse plastic bottles and reduce waste.
—
City Farming with Garlic: Grow Garlic Using Plastic Bottles
Step 1: Gather Your Materials
To grow garlic at home, you’ll need:
✔ A clear plastic bottle (1-2 liters, cleaned and dried)
✔ Healthy garlic bulbs (organic for best results)
✔ Chlorine-free water
✔ A sharp knife or scissors
✔ A sunny spot (balcony, windowsill, or outdoor area)
—
Step 2: Preparing the Plastic Bottle for Garlic Growth
1️⃣ Cut the Bottle:
Use scissors or a knife to cut the top half off the bottle.
Optionally, poke small drainage holes at the bottom if you plan to transplant directly in the bottle.
2️⃣ Prepare the Garlic Cloves:
Select large, healthy garlic cloves (avoid small or damaged ones).
Peel off the outer skin to expose the clove slightly but leave the bottom intact.
—
Step 3: Planting Garlic in Water (Hydroponic Method)
1️⃣ Fill the Plastic Bottle with Water:
Pour chlorine-free water (filtered or let tap water sit for 24 hours to remove chlorine).
Fill up to about 2 inches from the bottom.
2️⃣ Insert Garlic Cloves:
Place the pointed tip up and root side down.
Submerge only the base of the cloves in water.
3️⃣ Choose a Sunny Spot:
Keep the bottle in a bright location with 6-8 hours of indirect sunlight.
Avoid harsh direct sunlight, which can cause overheating.
—
Step 4: Garlic Sprouting and Early Care
✅ Monitor Water Levels:
Change the water every 2-3 days to prevent mold and bacteria.
Always keep the base of the cloves slightly submerged.
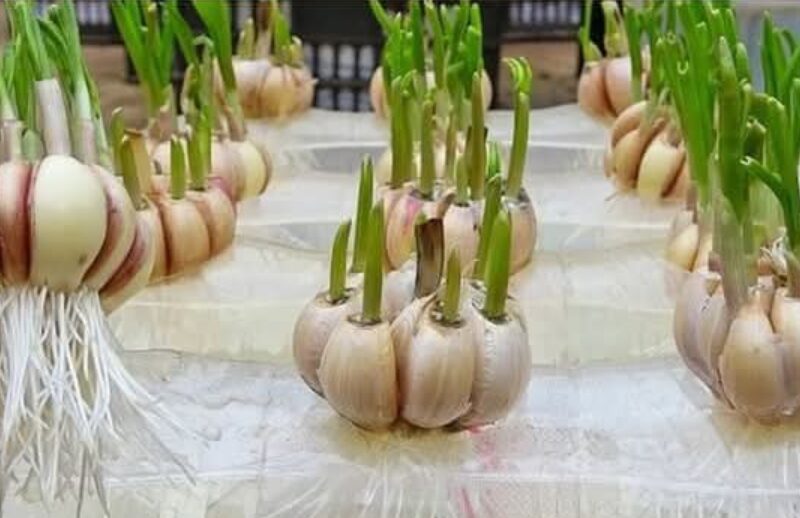
✅ Watch for Sprouting:
Within 5-7 days, you’ll see green shoots emerging.
Roots will start growing at the bottom of the garlic clove.
✅ Wait for Strong Root Growth:
Allow roots to grow 1-2 inches long before transplanting.
This process usually takes 2-3 weeks.
—
Step 5: Transplanting Garlic to Soil
Once the garlic has strong roots and sprouts, it’s time to transfer it to nutrient-rich soil for full bulb development.
1️⃣ Choose a Growing Medium:
Use a pot or garden soil rich in organic matter.
Ensure good drainage to prevent rot.
2️⃣ Plant the Sprouted Garlic:
Bury the sprouted clove 1-2 inches deep, keeping the green shoot above the soil.
Space each clove 4-6 inches apart if planting multiple cloves.
3️⃣ Provide Proper Sunlight & Watering:
Place the pot in a sunny spot (garlic needs 6+ hours of sun daily).
Water lightly to keep the soil moist but not soggy.
—
Step 6: Garlic Growth Stages & Harvesting
✅ First 1-2 Months:
Green leaves will continue growing.
Keep soil moist and fertilize every 4 weeks with compost or natural fertilizers.
✅ After 3-4 Months:
Leaves may start turning yellow—a sign that bulbs are forming.
Stop watering to allow garlic to mature.
✅ Harvesting (4-6 Months):
Once most leaves are brown and wilted, garlic is ready to harvest.
Gently dig up bulbs, shake off excess soil, and dry them for 2 weeks before using.
—
The Benefits of Growing Garlic in Plastic Bottles
🌍 Eco-Friendly & Sustainable:
Reduces plastic waste by repurposing bottles.
Encourages urban gardening in small spaces.
🍽 Culinary & Medicinal Uses:
Fresh garlic has more flavor and nutrients than store-bought varieties.
Garlic boosts immunity, fights infections, and lowers blood pressure.
💰 Cost-Effective:
One bulb of garlic can produce multiple new plants.
Saves money on groceries!
—
Frequently Asked Questions (FAQs)
1. How long does garlic take to grow?
Sprouting in water: 5-7 days
Growth in soil: 4-6 months for full bulbs
2. Can I keep growing garlic in water indefinitely?
You can grow garlic greens (scallion-like shoots) in water, but full bulbs need soil.
3. What if my garlic isn’t sprouting?
Ensure you’re using fresh, healthy garlic cloves.
Keep water clean and fresh.
Provide warmth (70-75°F / 21-24°C) to encourage sprouting.
4. Can I grow garlic indoors all year?
Yes! As long as it gets enough sunlight or grow lights, garlic can be grown indoors year-round.
5. How do I store harvested garlic?
Dry bulbs in a cool, dry place for 2 weeks.
Store in a mesh bag at room temperature.
—
Final Thoughts: Start Growing Your Own Garlic Today!
Growing garlic at home in plastic bottles is:
✅ Simple & beginner-friendly
✅ Space-saving for small apartments
✅ Cost-effective & sustainable
🌱 Start your garlic-growing journey today! Enjoy the benefits of fresh, homegrown garlic while reducing plastic waste.
Did you find this guide helpful? SHARE it with others and inspire more home gardeners!
—
How to grow garlic in water at home
Easy way to grow garlic in plastic bottles
Urban gardening hacks for small spaces
Best way to grow garlic indoors
Sustainable gardening with food scraps