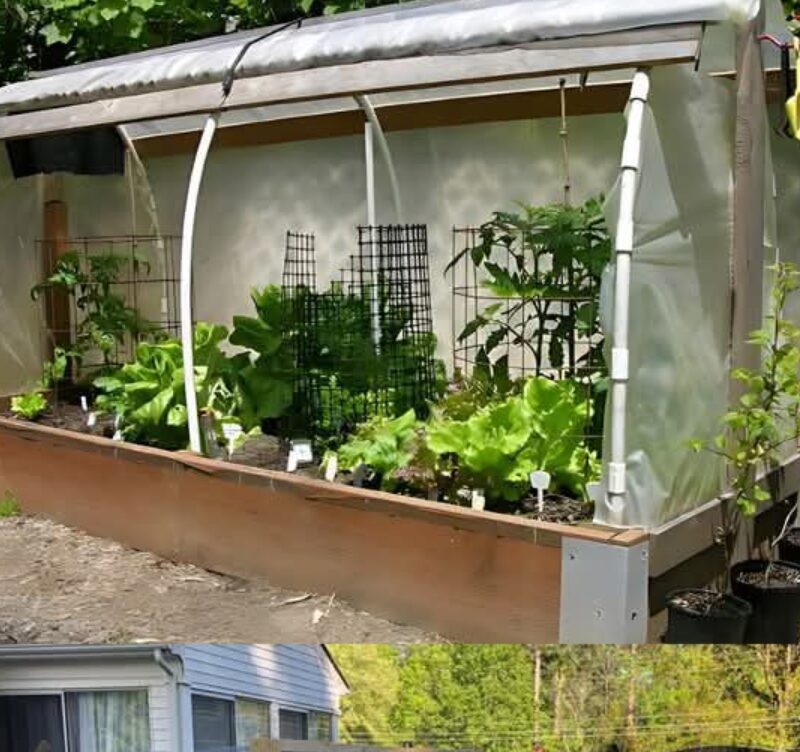
A hinged hoophouse is an excellent way to protect plants from harsh weather, extend the growing season, and create a mini greenhouse effect for your raised bed garden. Unlike a traditional hoophouse, a hinged version allows easy access for planting, watering, and harvesting.
This step-by-step guide will walk you through building a sturdy and functional hinged hoophouse for your raised garden bed.
—
Why Build a Hinged Hoophouse?
✔ Protects plants from frost, wind, and pests
✔ Extends the growing season for early planting and late harvests
✔ Provides an easy-access design—just lift the frame!
✔ Improves temperature control for sensitive plants
✔ Cost-effective and customizable
—
Materials Needed
1. Frame & Hoop Materials
PVC pipes (1/2-inch or 3/4-inch, depending on the size and strength needed)
PVC pipe fittings (elbows and T-joints for stability)
Wooden boards (for the hinged frame) (1×2″ or 2×2″ recommended)
2. Covering Materials
Clear plastic sheeting (6 mil greenhouse film is ideal)
Zip ties or garden clips (for securing plastic sheeting)
Weatherproof duct tape (optional for reinforcement)
3. Hinges & Fasteners
Hinges (sturdy outdoor-grade hinges)
Screws (rust-resistant, for attaching hinges)
Brackets or latches (to keep the hoophouse closed when needed)
—
Step-by-Step Instructions
Step 1: Measure and Plan
Measure the dimensions of your raised garden bed.
Decide on the height and width of the arches—usually 1.5 to 2 times the width of the bed to allow enough coverage.
Sketch a basic plan to visualize how the PVC frame will attach to the wooden hinge frame.
✔ Tip: A 3 to 4-foot-high hoophouse is ideal for most vegetable gardens.
—
Step 2: Cut the PVC Pipes
Cut PVC pipes to the required lengths:
Arch pipes: Long enough to bend over the bed.
Horizontal supports: To connect the arches along the top for stability.
✔ Tip: Use a PVC cutter or hacksaw for clean, precise cuts.
—
Step 3: Assemble the Hoops
Insert PVC pipes into the corners of the raised bed or drive short rebar stakes into the soil as supports.
Bend the PVC pipes into an arch shape and insert them into the opposite side.
Connect the arches with horizontal support pipes using T-joints or PVC elbows.
✔ Tip: For extra durability, drill screws through the PVC joints to prevent shifting.
—
Step 4: Attach the Plastic Sheeting
Drape the clear plastic sheeting over the PVC frame.
Secure it with zip ties or greenhouse clips to keep it taut.
If needed, tape down edges using weatherproof duct tape to prevent wind damage.
✔ Tip: Leave extra plastic on the edges to allow for adjustments and future re-tightening.
—
Step 5: Build the Hinged Frame
Construct a wooden frame that matches the top dimensions of the raised bed.
Use 1×2” or 2×2” wood to keep it lightweight but sturdy.
Attach PVC arches to the frame using screws or brackets.
✔ Tip: Pre-drill holes in the wood to prevent splitting when attaching the PVC pipes.
—
Step 6: Secure the Hinges
Attach hinges to one side of the wooden frame.
Secure the other side of the hinges to the raised bed frame.
Ensure that the hoophouse lifts easily and stays in position when opened.
✔ Tip: For added strength, use at least 2 hinges (one on each end) or 3 hinges for longer beds.
—
Step 7: Secure the Hoophouse & Make Final Adjustments
Attach latches or hooks to hold the hoophouse down during strong winds.
Trim any excess plastic for a neat and professional finish.
Test the hinged motion to ensure smooth lifting and closing.
✔ Tip: If the plastic loosens over time, re-secure it with clips or zip ties.
—
Maintenance & Usage Tips
✅ Ventilation: Open the hoophouse during warm days to prevent overheating.
✅ Watering: Use a soaker hose or drip irrigation to water plants without opening the cover frequently.
✅ Seasonal Adjustments: Switch clear plastic for shade cloth in the summer to reduce heat stress.
✅ Pest Control: Close the hoophouse at night to keep out pests like rabbits or deer.
—
Alternative Design Ideas
✅ Hoophouse with Automatic Venting: Install automatic greenhouse vents for hands-free temperature control.
✅ Tall Hinged Hoophouse: Use longer PVC pipes for taller plants like tomatoes or peppers.
✅ Reinforced Windproof Hoophouse: Add cross-braces for additional strength in windy areas.
—
Final Thoughts
Building a hinged hoophouse for your raised bed garden is a practical and rewarding project. It protects your plants, extends your growing season, and makes gardening easier—all with an affordable DIY approach.
Now that you have the knowledge, start building your own and enjoy fresh, homegrown vegetables all year round!
🌱 Have you built a hoophouse before? Share your experience and photos in the comments!