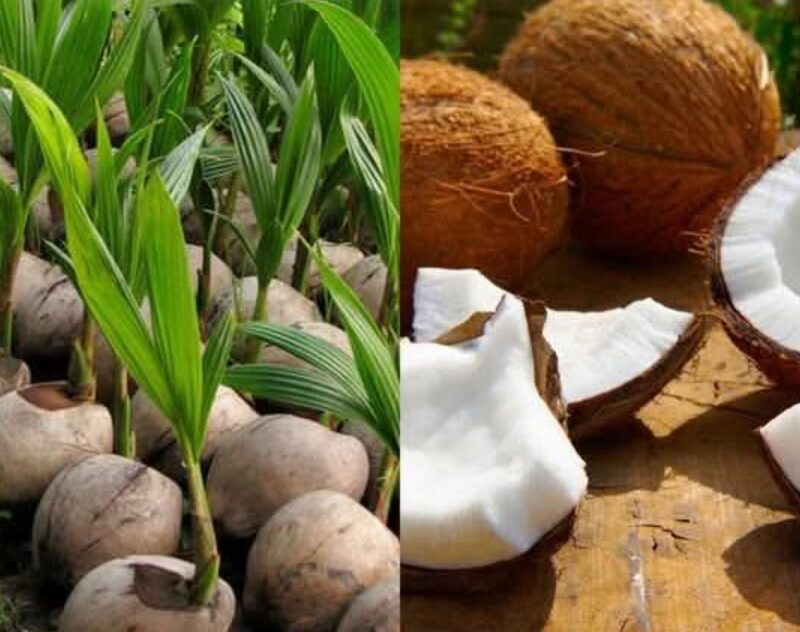
How to Grow a Coconut Tree from a Coconut Fruit: A Step-by-Step Guide
Coconut trees (Cocos nucifera) are tropical wonders that provide shade, food, and even decorative appeal. Growing a coconut tree from a coconut fruit may seem challenging, but with patience and the right conditions, you can cultivate your own palm at home.
In this detailed guide, we will explore how to grow a coconut tree from a fresh coconut, covering essential steps, common challenges, and tips for success.
—
1. Choosing the Right Coconut
To successfully grow a coconut tree, you need a mature, fresh coconut that still has water inside. Here’s how to select the best one:
Choose a heavy coconut—this indicates it still contains moisture.
Shake the coconut near your ear. If you hear sloshing water, it’s a good sign.
Avoid coconuts with visible cracks or mold.
For best results, get a coconut that still has its outer husk intact, as this helps with germination.
—
2. Preparing the Coconut
Once you have your coconut, follow these preparation steps:
If the coconut has a husk, carefully remove it without damaging the inner shell.
Locate the three “eyes” (small, round spots) on one end of the coconut. These are natural openings where the shoot will emerge.
—
3. Identifying the Soft Eye
Among the three eyes, one will be softer than the others. This is where the sprout will emerge.
Gently press each eye with your thumb to find the softest one.
Mark this eye, as it should be positioned facing up when planted.
—
4. Soaking the Coconut for Germination
To soften the shell and encourage germination:
Method 1: Submerge the coconut in water for 2-3 days.
Method 2: Bury it in moist sand for a few days to retain moisture.
This step helps mimic the natural conditions of a coconut washing up onshore and sprouting in a tropical climate.
—
5. Preparing the Planting Container
Before planting, prepare an appropriate container:
Use a large pot with drainage holes.
Fill it with well-draining soil (a mix of sandy soil and compost works best).
Avoid heavy, compacted soil—coconut trees need loose, aerated soil.
—
6. Planting the Coconut
Now, it’s time to plant:
Lay the coconut sideways, with the soft eye facing up.
Bury about one-third of the coconut in the soil.
Keep most of the shell exposed to allow proper air circulation.
—
7. Watering Requirements
Coconut trees love moisture but hate waterlogged conditions.
Water regularly, keeping the soil moist but not soaked.
If the soil dries out too much, the seed may not sprout.
Reduce watering slightly during cooler months.
—
8. Creating a Mini Greenhouse Effect
Coconuts germinate best in warm, humid conditions.
Cover the pot with a clear plastic bag or plastic wrap to trap moisture.
This creates a mini greenhouse effect, speeding up germination.
Ensure there is some air circulation to prevent mold growth.
—
9. Providing Warmth and Sunlight
Coconut trees thrive in warmth. To ensure proper growth:
Place the pot in a warm, sunny location with indirect sunlight.
Maintain a temperature of at least 75–85°F (24–29°C).
Avoid placing the coconut in cold or drafty areas, as low temperatures slow down germination.
—
10. Patience is Key: Germination Timeline
Coconut trees take time to sprout, so be patient:
Germination may take 3–6 months.
Regularly check for signs of a small green shoot emerging from the soft eye.
Ensure the soil remains moist and warm throughout this period.
—
11. Transplanting the Seedling
Once the coconut sprout reaches 6–12 inches (15–30 cm) in height, it’s time to transplant:
Choose a larger pot or plant it directly in the ground.
If planting in a garden, select a sunny, well-drained spot with plenty of space.
Dig a hole twice the size of the root ball and plant it with the coconut partially above ground.
—
12. Long-Term Care for a Healthy Coconut Tree
Watering
Continue to water regularly, but ensure good drainage.
Mature coconut trees can tolerate drought but grow best with consistent moisture.
Fertilizing
Use a palm tree fertilizer rich in nitrogen, potassium, and magnesium.
Fertilize every 2-3 months during the growing season.
Protecting from Cold
Coconut trees are tropical plants and do not tolerate cold temperatures.
If temperatures drop below 50°F (10°C), move the pot indoors or cover the tree with protective fabric.
—
13. Enjoy Your Growing Coconut Tree!
With the right care, your coconut tree will flourish, creating a tropical atmosphere in your space. While growing a coconut tree indoors or in cooler climates may limit fruit production, it still makes a beautiful and rewarding plant.
How Long Does It Take to Grow a Mature Coconut Tree?
A coconut tree takes about 5–7 years to start producing coconuts.
Full maturity, with regular fruit production, takes 10–15 years.
—
Common Problems & Troubleshooting
1. Coconut Not Sprouting
Ensure the coconut was fresh before planting.
Keep the environment warm and humid—low temperatures slow germination.
Make sure moisture levels are consistent (not too dry, not waterlogged).
2. Yellowing Leaves
Could be due to overwatering or underwatering.
Check for nutrient deficiencies—add fertilizer if needed.
3. Mold or Rot
Happens when the soil is too wet.
Ensure proper drainage and allow soil to dry slightly between waterings.
—
Final Thoughts
Growing a coconut tree from a coconut fruit is a rewarding and exciting experience. While it requires patience and the right conditions, the process is simple and enjoyable. Whether you’re growing it for its tropical beauty or hoping for homegrown coconuts, following these steps will set you up for success.
So, grab a fresh coconut, start planting, and bring a slice of the tropics to your home or garden!