Introduction
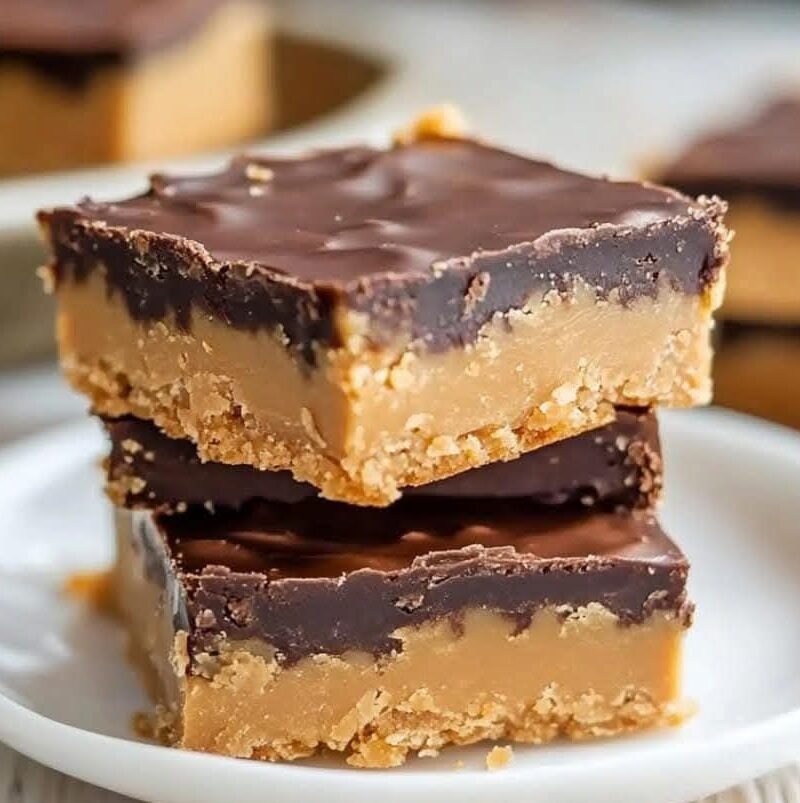
If you’re a fan of peanut butter and chocolate, these No Bake Peanut Butter Bars will quickly become your new favorite treat. They require minimal effort, no oven, and just a handful of ingredients to create a dessert that rivals even the best peanut butter cups.
This article is more than just a recipe—it’s a deep dive into the history of peanut butter bars, variations, tips, storage methods, serving ideas, and even fun facts about peanut butter and chocolate. By the end of this guide, you’ll be a pro at making these decadent, buttery bars, perfect for every occasion.
—
History of Peanut Butter Bars
The combination of peanut butter and chocolate has been a beloved duo for decades. But where did this trend originate?
The Rise of Peanut Butter and Chocolate
Peanut butter became popular in the early 1900s, primarily as a high-protein food.
In the 1920s and 30s, candy companies started pairing peanut butter with chocolate, leading to famous confections like Reese’s Peanut Butter Cups.
No-bake desserts gained traction in the mid-20th century as home cooks looked for quick and easy recipes that didn’t require an oven.
The No Bake Peanut Butter Bar is a variation of buckeye candies (a famous Ohio treat) but made in bar form for easier preparation.
These bars became a household favorite due to their simplicity, rich flavor, and versatility.
—
Ingredients and Why They Work
For the Bars:
1 cup salted butter – Provides richness and enhances the overall flavor.
1 cup smooth peanut butter – The star ingredient, adding creaminess and a nutty taste.
2 cups Ritz cracker crumbs (about 6 oz of Ritz crackers, crushed) – Instead of using graham crackers, Ritz adds a unique salty crunch.
2 cups confectioner’s sugar – Sweetens the bars and helps with texture.
For the Topping:
1 ½ cups semi-sweet chocolate chips – The perfect balance between bitter and sweet, complementing the peanut butter.
¼ cup smooth peanut butter – Helps the chocolate stay smooth and spreadable.
These ingredients create a perfect balance of salty, sweet, and creamy textures.
—
Step-by-Step Instructions
Step 1: Melt the Butter
1. Place 1 cup of salted butter in a microwave-safe bowl.
2. Microwave on high for 30 seconds, or until partially melted.
> Tip: If using unsalted butter, add ½ teaspoon salt for flavor balance.
Step 2: Mix the Base Ingredients
1. Pour the melted butter into a large mixing bowl.
2. Add 1 cup of peanut butter and mix until smooth using an electric mixer.
3. Add 2 cups of crushed Ritz cracker crumbs and 2 cups of confectioner’s sugar.
4. Mix until fully combined and a thick, cohesive mixture forms.
> Tip: Use a food processor to crush the crackers into fine crumbs for a smoother texture.
Step 3: Prepare the Base Layer
1. Line a 9×13-inch baking dish with parchment paper for easy removal.
2. Press the peanut butter mixture firmly into the dish, ensuring an even layer.
> Tip: Use the back of a spoon or a flat spatula to smooth out the surface.
Step 4: Melt the Chocolate Topping
1. In a microwave-safe bowl, combine 1 ½ cups of semi-sweet chocolate chips and ¼ cup peanut butter.
2. Microwave for 45 seconds, then stir.
3. If the chocolate isn’t fully melted, microwave for an additional 30 seconds and stir until smooth.
> Tip: If you don’t have a microwave, melt the chocolate and peanut butter using a double boiler.
Step 5: Add the Topping
1. Pour the melted chocolate mixture evenly over the peanut butter base.
2. Use a spatula to spread it smoothly.
> Tip: Tap the dish gently on the counter to remove air bubbles.
Step 6: Chill
1. Refrigerate for at least 2 hours, or until firm.
Step 7: Slice and Serve
1. Once chilled, remove from the fridge and let it sit at room temperature for 5 minutes before cutting.
2. Slice into squares or bars and enjoy!
—
Variations
Want to mix things up? Here are some creative variations:
1. Crunchy Peanut Butter Bars
Swap smooth peanut butter for crunchy peanut butter to add texture.
2. Graham Cracker Base
Replace Ritz crackers with graham cracker crumbs for a more traditional no-bake bar.
3. Oatmeal Peanut Butter Bars
Add ½ cup of quick oats to the mixture for a chewier texture.
4. Dark Chocolate Topping
Use dark chocolate chips instead of semi-sweet for a richer, slightly bitter taste.
5. Swirled Topping
Melt white chocolate and drizzle over the top for a beautiful marbled effect.
—
Tips for Perfect Peanut Butter Bars
Use high-quality peanut butter – Natural peanut butter can separate, so stick to brands like Jif or Skippy.
Chill long enough – Rushing the chilling process can lead to a gooey mess.
Cut with a warm knife – Run your knife under hot water, wipe it dry, and slice for clean cuts.
—
Storage and Shelf Life
Refrigerator
Store in an airtight container for up to 1 week.
Freezer
Freeze for up to 3 months in a freezer-safe bag.
Let thaw for 15 minutes at room temperature before serving.
> Tip: Wrap individual bars in wax paper before freezing for easy snacking.
—
Serving Ideas
With Ice Cream – Pair with vanilla or chocolate ice cream for a decadent treat.
As a Holiday Treat – Decorate with sprinkles for a festive touch.
With Coffee – The rich peanut butter and chocolate flavors pair beautifully with coffee.
—
Fun Facts About Peanut Butter and Chocolate
1. Reese’s Peanut Butter Cups were created in 1928 by H.B. Reese, a former dairy farmer.
2. Americans consume over 700 million pounds of peanut butter per year.
3. The world’s largest peanut butter cup weighed 440 pounds!
—
Frequently Asked Questions
1. Can I make these bars nut-free?
Yes! Substitute peanut butter with sunflower seed butter or almond butter.
2. What if I don’t have confectioner’s sugar?
Use granulated sugar blended into a fine powder as a substitute.
3. Can I use white chocolate instead?
Absolutely! White chocolate adds a different but delicious twist.
—
Final Thoughts
No Bake Peanut Butter Bars are the perfect combination of sweet, salty, and chocolaty goodness. Whether you’re making them for a party, as a quick snack, or just to satisfy a sweet craving, this detailed guide ensures you get them right every time.
Now that you have everything you need, it’s time to make your own batch and indulge!