Maintaining healthy plants while minimizing water consumption can be a challenge, especially if you’re planning to be away or aiming to reduce your utility bill. However, with innovative DIY techniques, you can keep your plants hydrated for up to a month without spending extra money. This guide will not only teach you effective methods but also explore their background, variations, and expert tips to ensure success. Let’s dive into these eco-friendly, cost-free watering systems.
—
The Importance of Efficient Watering
Water is essential for plant survival, but improper watering can harm them. Overwatering leads to root rot, while underwatering causes wilting and stunted growth. The techniques described here focus on providing consistent moisture to plants, mimicking natural processes and reducing water wastage.
—
Method 1: Slow-Release Watering Using a Buried Plastic Bottle
Why This Method Works
The buried plastic bottle system is inspired by ancient irrigation methods like the olla (clay pot) technique, which provided a slow, steady release of water to plants. By using modern, recycled materials like plastic bottles, this method achieves similar results with minimal effort and cost.
Materials Needed:
A large plastic bottle (preferably 2 liters)
Marker
Sharp tool (awl or heated iron rod)
Water
Step-by-Step Guide:
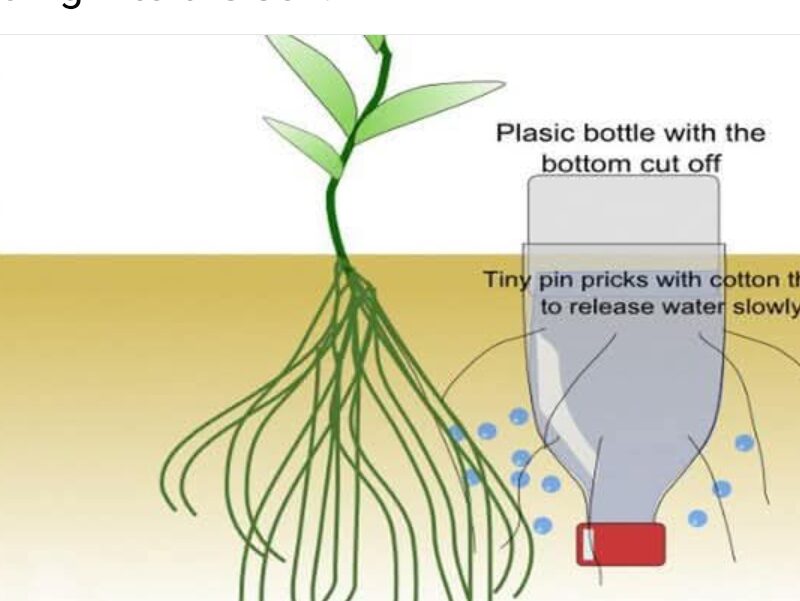
1. Prepare the Bottle
Clean the plastic bottle thoroughly to remove any residues. Remove the labels for a cleaner look and mark two lines:
One 15 centimeters from the bottom.
Another 10 centimeters from the neck.
2. Create the Water Outlet
Using a sharp tool, make a small hole approximately 7 centimeters from the bottom. This hole controls the water flow, ensuring a slow release to the soil.
3. Fill the Bottle
Fill the bottle with water up to the lower line. Screw the cap on tightly to prevent evaporation.
4. Position the Bottle
Dig a hole near the plant’s base and bury the bottle up to the marked line. Ensure the hole you made faces the plant roots.
5. Final Setup
Once buried, fill the bottle completely with water, tighten the cap, and cover the surrounding soil, leaving the bottle neck exposed. This setup allows for easy refilling if needed.
—
Method 2: Wicking System with a Plastic Bottle and Fabric/String
Why This Method Works
The wicking system uses capillary action to draw water from a reservoir to the plant’s roots. It’s simple, reliable, and ensures that plants get just the right amount of moisture without becoming waterlogged.
Materials Needed:
Plastic bottle
Cotton fabric or thick cotton string
Water
Sharp tool for making a hole
Step-by-Step Guide:
1. Prepare the Bottle
Wash the bottle and make a small hole in the cap using a sharp tool.
2. Thread the Fabric/String
Cut a piece of fabric or string. Thread it through the hole in the cap, ensuring it extends several inches both inside and outside the bottle.
3. Fill and Seal
Fill the bottle with water and screw the cap back on, ensuring the fabric/string is saturated. The fabric acts as a wick to transfer water to the soil.
4. Position the Bottle
Place the bottle cap-side down in the soil near the plant. The fabric/string should touch the soil, allowing water to seep into it gradually.
—
Method 3: DIY Self-Watering System with Multiple Bottles
Variations and Customizations
For larger gardens, you can scale these methods by using multiple bottles or larger containers. Arrange bottles at strategic points around your garden or connect several bottles to create a network of slow-release watering systems.
—
Method 4: Using Household Items as Moisture Retainers
If you don’t have plastic bottles, consider alternatives like:
Clay Pots: Similar to the ancient olla technique, burying a clay pot near plant roots provides consistent moisture.
Sponges: Place a wet sponge under the soil near the plant base to retain water.
Plastic Bags: Fill a sealed plastic bag with water, poke small holes, and position it near the plants.
—
Backstory: The Evolution of DIY Watering Techniques
Efficient irrigation has been a focus for centuries. From the use of ancient clay pots in arid regions to modern drip irrigation systems, people have always sought innovative ways to conserve water. These DIY methods bring together traditional wisdom and modern recycling practices, making them accessible to anyone.
—
Additional Tips for Success
1. Test Before You Leave
Ensure the system works effectively by testing it for a few days before leaving your plants unattended.
2. Choose the Right Bottles
Use sturdy, undamaged bottles to prevent leaks or collapses.
3. Monitor Soil Moisture
Check the soil periodically to ensure it’s neither too dry nor waterlogged. Adjust the bottle size or hole placement as needed.
4. Group Plants Together
Placing plants closer together reduces water evaporation and creates a microenvironment that retains moisture.
5. Use Mulch
Covering the soil with mulch helps retain moisture and prevents quick evaporation.
—
Common Mistakes to Avoid
1. Too Many Holes
Creating too many holes in the bottle can cause the water to drain too quickly.
2. Improper Placement
Ensure the bottle is close enough to the plant roots to be effective.
3. Neglecting Maintenance
Clean the bottles regularly to prevent algae buildup or clogging.
—
Environmental Impact
By using recycled plastic bottles, you’re not only saving water but also reducing plastic waste. These methods align with sustainable gardening practices, making them an eco-friendly choice for plant care.
—
Conclusion
With these methods, you can water your plants for up to a month without spending a dime. Whether you choose the slow-release bottle technique or the wicking system, these DIY solutions are simple, effective, and environmentally friendly. So go ahead, give your plants the care they deserve while saving time, money, and resources!
