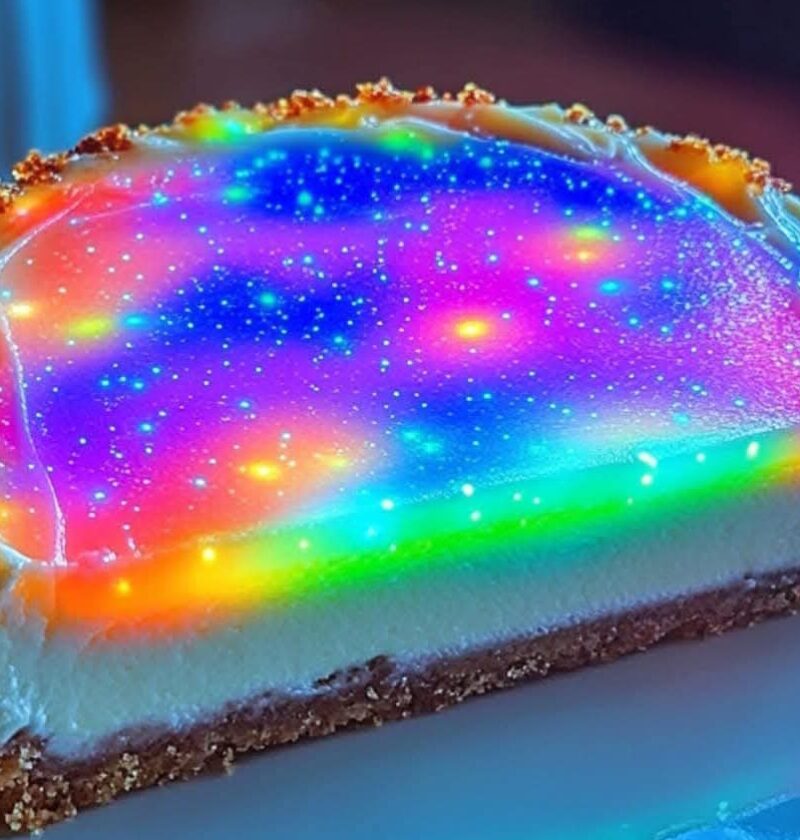
Northern Lights Cheesecake Candy Glow is a dazzling and whimsical dessert that captures the ethereal beauty of the auroras in a creamy and delicious cheesecake. This recipe combines vibrant colors, a dreamy texture, and an enchanting presentation to make it the perfect centerpiece for any occasion. Here’s an extended deep dive into this dessert, from its creation to its cultural inspiration, variations, and tips for perfecting it.
—
The Inspiration Behind the Northern Lights Cheesecake
The Northern Lights, or Aurora Borealis, have fascinated humanity for centuries with their vivid colors and mysterious dance across the night sky. This cheesecake draws inspiration from their mesmerizing hues of pink, green, blue, and purple. Each layer of this no-bake dessert reflects the natural phenomenon, creating an edible masterpiece that’s both visually stunning and indulgently creamy.
—
Why This Cheesecake Stands Out
1. A Visual Treat: The swirling, glowing colors mimic the magic of the Northern Lights, making it as much a feast for the eyes as it is for the palate.
2. No-Bake Simplicity: This dessert skips the oven, making it beginner-friendly and perfect for warm weather.
3. Customizable Colors: You can adjust the hues and patterns to suit your creativity or occasion.
4. Perfect for Celebrations: Its whimsical appearance makes it ideal for birthdays, holidays, or any special gathering.
—
Northern Lights Cheesecake Recipe
Ingredients
For the Crust:
1 ½ cups graham cracker crumbs
⅓ cup unsalted butter, melted
2 tablespoons granulated sugar
For the Cheesecake Filling:
16 oz cream cheese, softened
1 cup granulated sugar
1 teaspoon vanilla extract
½ cup heavy whipping cream
¼ cup sour cream
1 tablespoon gelatin powder, dissolved in ¼ cup hot water
Food coloring: pink, blue, purple, and green
For the Topping:
Edible glitter or luster dust
Cotton candy (optional, for decoration)
—
Instructions
Step 1: Prepare the Crust
In a mixing bowl, combine graham cracker crumbs, melted butter, and sugar.
Mix thoroughly until the crumbs are evenly coated.
Press the mixture firmly into the bottom of a 9-inch springform pan to form an even layer.
Place the pan in the refrigerator to chill while you prepare the filling.
—
Step 2: Make the Cheesecake Filling
In a large bowl, use an electric mixer to beat the cream cheese and sugar until smooth and creamy.
Add the vanilla extract, heavy whipping cream, and sour cream, continuing to beat until fully combined.
Slowly fold in the dissolved gelatin mixture, ensuring it’s evenly incorporated.
—
Step 3: Color the Filling
Divide the cheesecake filling into four bowls.
Add a few drops of pink, blue, purple, and green food coloring to each bowl.
Stir gently to create vibrant, evenly mixed colors.
—
Step 4: Layer and Swirl the Cheesecake
Pour the colored fillings into the prepared crust, alternating colors in dollops.
Use a toothpick or skewer to swirl the colors gently, creating a marbled, glowing effect reminiscent of the Northern Lights.
—
Step 5: Chill the Cheesecake
Cover the cheesecake with plastic wrap or aluminum foil.
Refrigerate for at least 4-6 hours, or until fully set.
—
Step 6: Add the Topping
Once the cheesecake is firm, sprinkle the top with edible glitter or luster dust to give it a sparkling glow.
For an extra whimsical touch, garnish with cotton candy just before serving.
—
Pro Tips for Success
1. Work Quickly with Gelatin: Once the gelatin is added, work quickly to pour and swirl the layers, as it begins to set fast.
2. Use High-Quality Food Coloring: Gel or paste food coloring works best for vibrant hues without altering the texture.
3. Refrigeration is Key: Patience is essential; the cheesecake needs ample time to chill and firm up for perfect slices.
4. Add Glitter Last Minute: Edible glitter is most effective when applied just before serving for maximum sparkle.
—
Variations of Northern Lights Cheesecake
1. Flavor Infusions:
Add a hint of lemon or orange zest for a citrusy twist.
Incorporate berry purees like raspberry or blueberry for natural flavor and color.
2. Alternative Crusts:
Use chocolate cookie crumbs or crushed Oreos for a richer base.
Try a nut crust made with almonds or pecans for added texture.
3. Different Themes:
Adjust the colors to mimic other natural phenomena like sunsets, ocean waves, or even galaxies.
4. Vegan Version:
Substitute cream cheese with plant-based alternatives and gelatin with agar-agar for a vegan-friendly dessert.
—
The Science Behind the Perfect Cheesecake
1. Gelatin as a Stabilizer:
Gelatin ensures the no-bake cheesecake holds its shape without cracking or collapsing.
2. Balanced Ratios:
The combination of cream cheese, heavy cream, and sour cream provides the ideal balance of creaminess and tang.
3. Layering and Swirling:
Pouring and swirling the colored layers just before setting ensures the vibrant patterns remain intact.
—
Serving Suggestions
For Parties: Serve as a show-stopping centerpiece with neon lights or aurora-themed decorations.
With Drinks: Pair with sparkling wine or a lavender-infused cocktail for an elegant dessert experience.
As Gifts: Slice and box individual servings for a delightful homemade gift.
—
The Magic of Edible Art
Northern Lights Cheesecake Candy Glow is more than just a dessert—it’s a conversation starter and a piece of edible art. Its ethereal appearance inspires awe, while its creamy, rich flavor leaves a lasting impression.
—
Frequently Asked Questions
1. Can I freeze this cheesecake?
Yes, you can freeze it without the toppings for up to 2 months. Thaw overnight in the refrigerator before serving.
2. What if I don’t have edible glitter?
You can use finely crushed rock candy or sugar crystals for a similar sparkling effect.
3. Can I make mini cheesecakes?
Absolutely! Use a muffin tin with cupcake liners and follow the same layering and chilling process.
—
Conclusion
The Northern Lights Cheesecake Candy Glow is a magical dessert that combines art and flavor, making it a unique addition to any celebration. Its vibrant colors and creamy texture captivate the senses, while its easy preparation makes it accessible to bakers of all skill levels. Whether you’re hosting a party, creating a themed dessert table, or simply indulging your love for sweets, this cheesecake is sure to shine.
