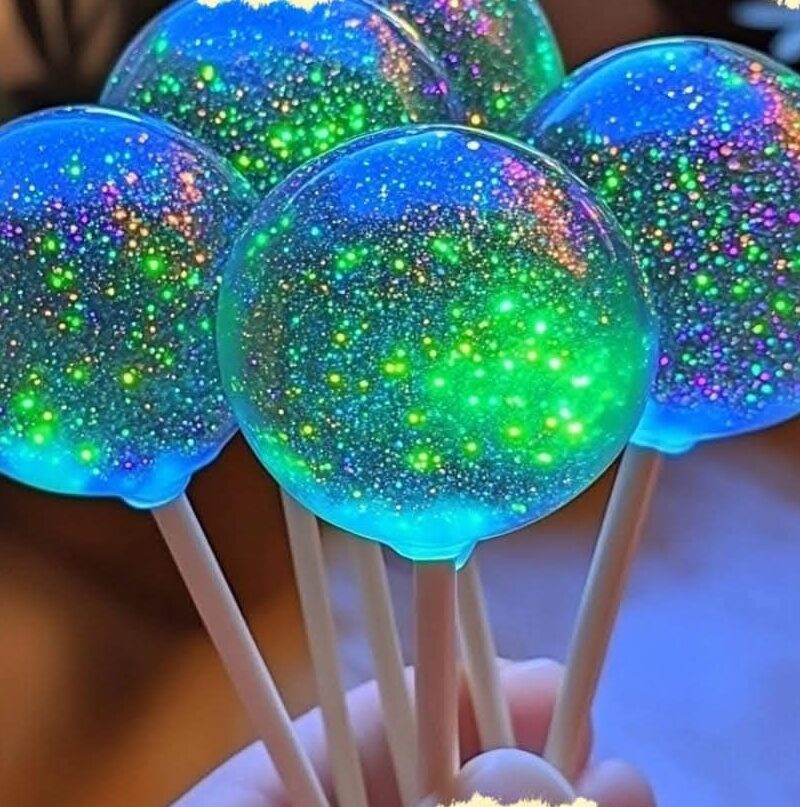
Inspired by the enchanting beauty of the Aurora Borealis, these Northern Lights Candy Glow pieces are a whimsical and eye-catching treat. Perfect for parties, gifts, or just a fun kitchen project, this candy recipe captures the magic of the night sky in every bite.
—
Why You’ll Love This Recipe
1. A Feast for the Eyes: The swirling neon colors and shimmering glitter create a candy that’s as beautiful as it is delicious.
2. Simple Ingredients: With just a handful of pantry staples, you can create a show-stopping dessert.
3. Perfect for Any Occasion: These candies are great for themed events, kids’ parties, or as unique edible gifts.
—
Ingredients
Base Ingredients:
1 cup granulated sugar
1/2 cup light corn syrup
1/4 cup water
1/2 teaspoon clear vanilla extract (or almond extract for a flavor twist)
Colors and Effects:
Neon food coloring: green, blue, and purple
Edible glitter or shimmer dust (optional, for added sparkle)
Equipment:
Candy thermometer
Lollipop molds or parchment paper
Medium saucepan
Mixing bowls (for dividing colors)
—
Step-by-Step Instructions
1. Prepare Your Workspace
Lightly grease your lollipop molds with butter or non-stick spray.
If making freeform candy, line a flat baking sheet with parchment paper.
—
2. Make the Candy Base
1. In a medium saucepan, combine sugar, corn syrup, and water.
2. Stir over medium heat until the sugar dissolves completely. Avoid stirring once the mixture starts to boil to prevent crystallization.
3. Increase the heat and bring the mixture to a boil. Use a candy thermometer to monitor the temperature until it reaches 300°F (150°C) (the hard crack stage).
—
3. Add Flavor
Remove the saucepan from heat and stir in clear vanilla extract (or almond extract, if using). Be careful—it may bubble up slightly.
—
4. Divide and Color
1. Carefully divide the hot candy mixture into three separate bowls.
2. Add a few drops of neon green food coloring to one bowl, blue to the second, and purple to the third.
3. Stir each bowl quickly and thoroughly until the colors are vibrant and evenly mixed.
4. (Optional) Add a pinch of edible glitter or shimmer dust to each bowl for extra sparkle.
—
5. Shape the Candy
For Lollipops: Pour or spoon the colored candy into the prepared lollipop molds, swirling the colors together with a toothpick for a marbled effect.
For Freeform Pieces: Drizzle the colored candy onto the parchment paper in random patterns, allowing the colors to blend naturally.
—
6. Cool and Set
Let the candy cool at room temperature for about 15-20 minutes, or until fully hardened.
—
7. Serve and Enjoy
Remove the lollipops from their molds or break the freeform candy into shards.
Serve immediately or package in cellophane bags for gifting.
—
Tips for Success
1. Work Quickly: Candy hardens fast, so have everything prepared before you start.
2. Use a Candy Thermometer: Accurate temperature measurement is key to achieving the perfect hard crack stage.
3. Safety First: The candy mixture will be extremely hot, so handle with care and keep kids at a safe distance.
4. Experiment with Colors: Try other neon colors, like pink or yellow, to create different effects.
—
Creative Variations
1. Cosmic Galaxy Candy
Add edible silver stars or galaxy-themed sprinkles to the candy for a celestial twist.
2. Minty Aurora
Replace vanilla extract with peppermint extract for a refreshing flavor.
3. Winter Wonderland
Use blue and white food coloring with edible snowflake sprinkles for a frosty look.
—
Nutritional Information (Per Piece)
Calories: ~120 kcal
Carbohydrates: ~30g
Sugar: ~29g
—
Why This Recipe Works
The combination of simple ingredients, vibrant colors, and a touch of edible glitter transforms basic hard candy into a mesmerizing treat. The use of neon food coloring mimics the swirling hues of the Northern Lights, while the optional glitter adds an extra magical touch.
—
Frequently Asked Questions
1. Can I Make This Without a Candy Thermometer?
While a thermometer is highly recommended for accuracy, you can test the hard crack stage by dropping a small amount of the candy mixture into cold water. If it hardens immediately and snaps, it’s ready.
2. How Long Do These Candies Last?
Store the candies in an airtight container at room temperature for up to 2 weeks.
3. Can I Add Other Flavors?
Yes! Try citrus extracts (like lemon or orange) or experiment with berry flavors for a fruity variation.
—
The Perfect Candy for Any Occasion
The Northern Lights Candy Glow recipe brings together artistry and flavor in one irresistible treat. Whether you’re making these for a holiday party, a science-themed event, or just for fun, they’re sure to impress with their dazzling colors and delicious taste. Try this recipe today and let the magic of the Aurora Borealis light up your dessert table!
